User manual — every screen, what you see and what you can do.
Menu bar
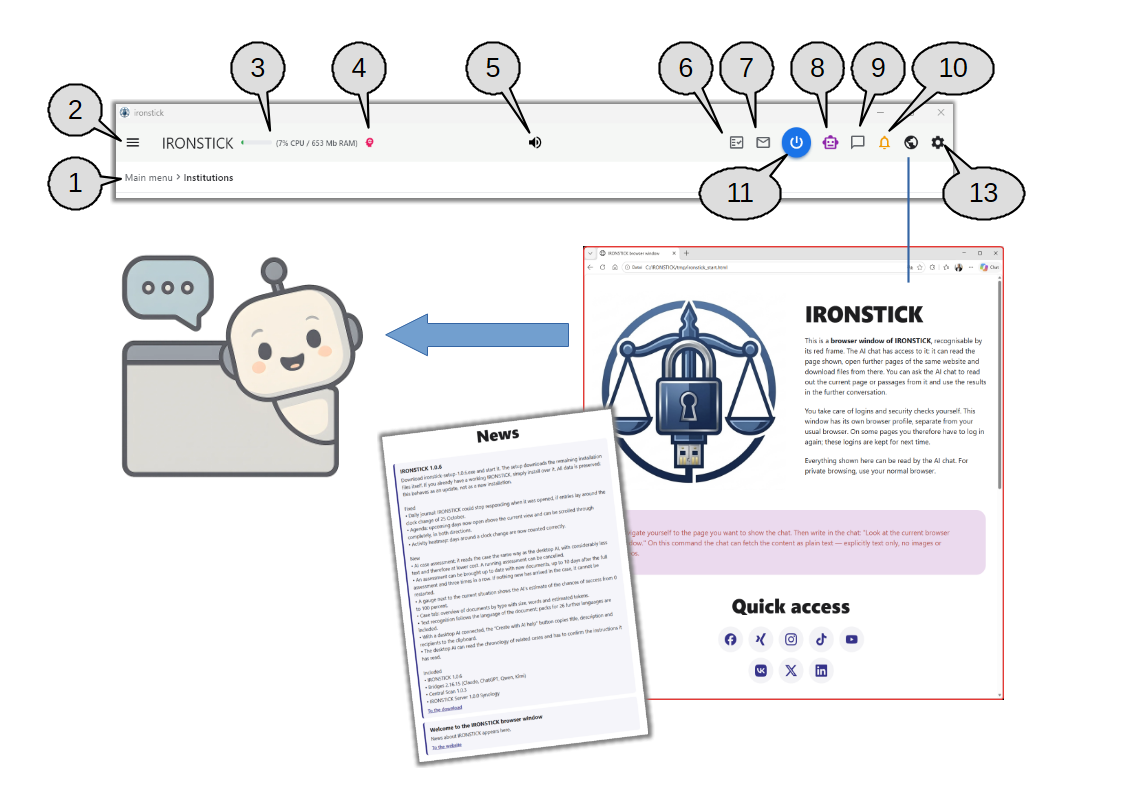
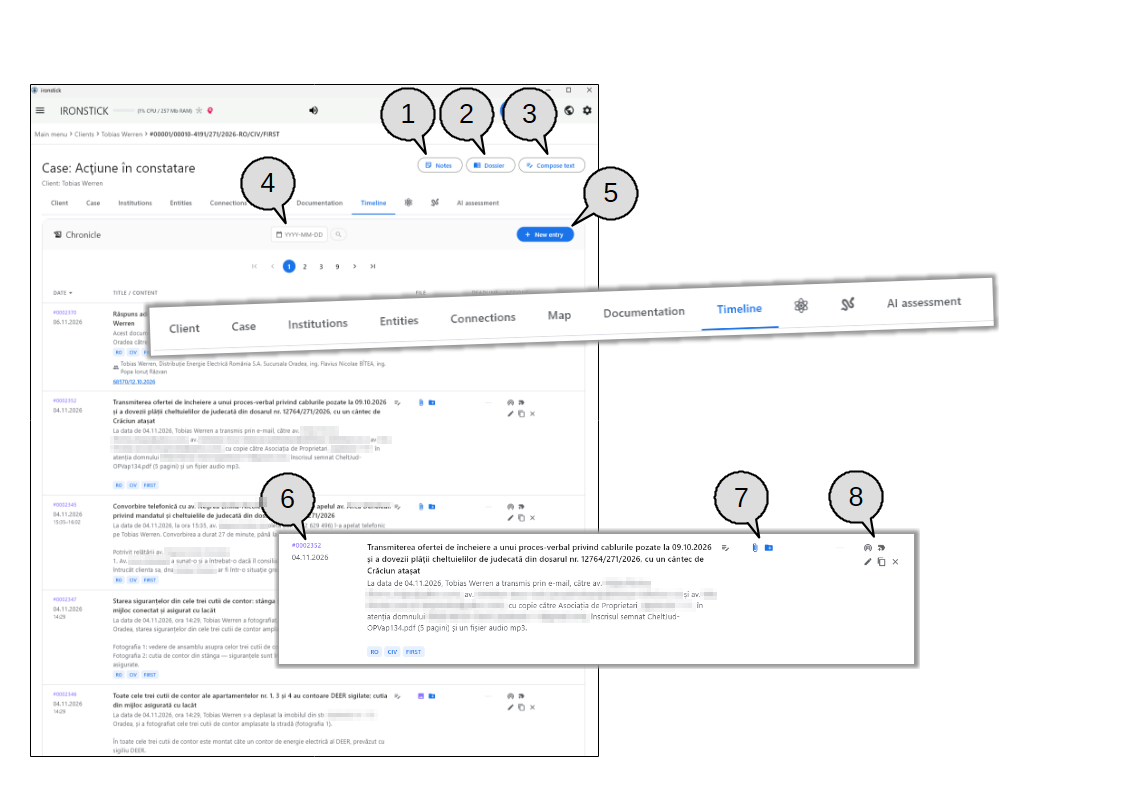
The menu bar that sits at the top of every screen, and the IRONSTICK browser window opened from the globe.
The menu bar sits at the top of every screen of IRONSTICK, so you can reach the important functions from anywhere.
On the left are the navigation menu and the program name, together with small live indicators. In the middle is the daily briefing. On the right are the
indicators for new e-mails, deadlines and messages, the AI chat, the browser window, the configuration and the power button. Under the bar, the breadcrumb line shows where you are.
Many symbols appear only when there is something to show. A red, animated symbol means that something new is waiting for you.
Breadcrumb. Shows the path to the current screen, for example Main menu › Institutions. The last part is the screen you are on. Click an earlier part to go straight back to it.
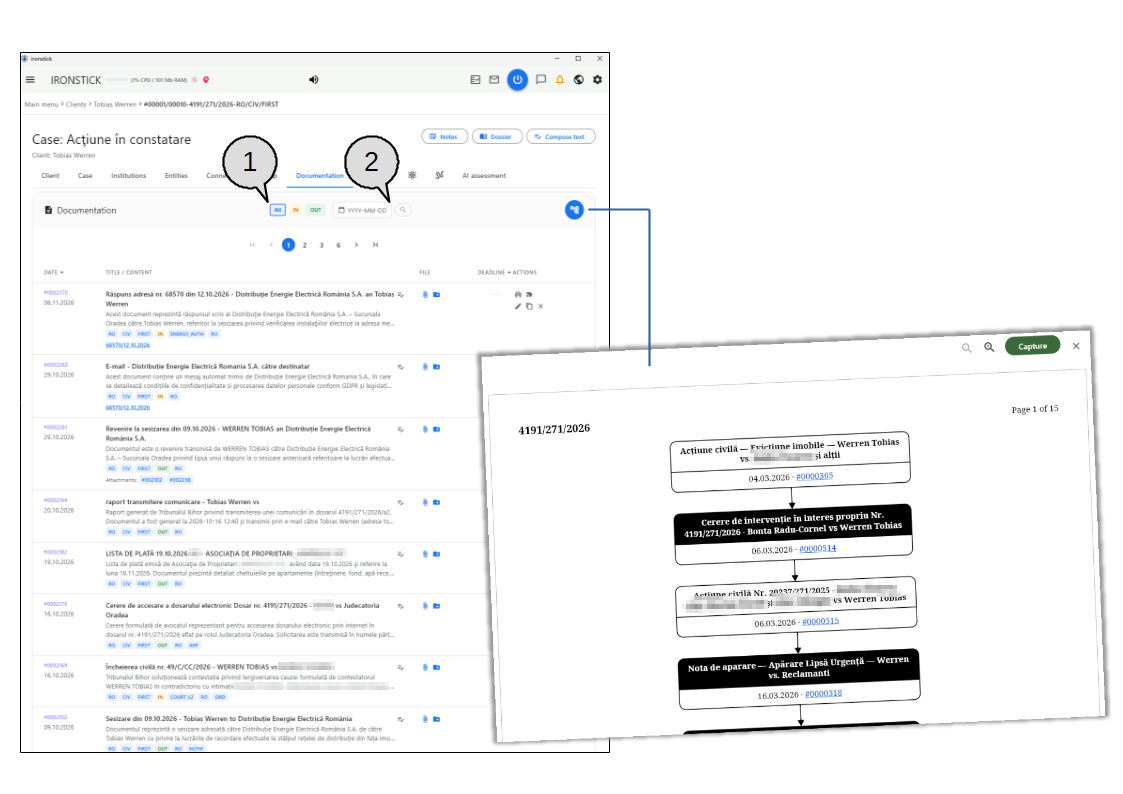
Navigation menu (burger). Opens the side menu with Main menu, Clients, Institutions, Persons, Deadlines, Tags, Texts and Search. The screen you are on is highlighted in blue. The red power symbol at the bottom of the menu closes the program, just like the power button.
Resource display (Windows only). A small bar and the text (CPU / RAM) show how much processor power and memory IRONSTICK itself is using. The bar is green, turns orange from 50 % and red from 80 %. Point at it to see which background tasks are running right now, with their progress and running time. Tasks that can be stopped have a red X.
AI memory (pink brain). Appears as soon as the AI has stored notes in its memory. It pulses while the AI is reading or writing the memory. Click it to check the stored notes. You can delete all notes for one client at once, or tick single notes from the latest 100 and delete them.
Daily briefing (speaker). Opens the daily briefing at any time: what is ahead today (deadlines, court dates, appointments, e-mails), what has already been done today, and a short look back. Click a line to open the matching screen, for example the deadlines, the calendar, the E-mail Monitor or the case. Read aloud plays the spoken version and Stop ends it. A switch changes the style of the spoken text only. If your last backup is more than five days old, the briefing warns you.
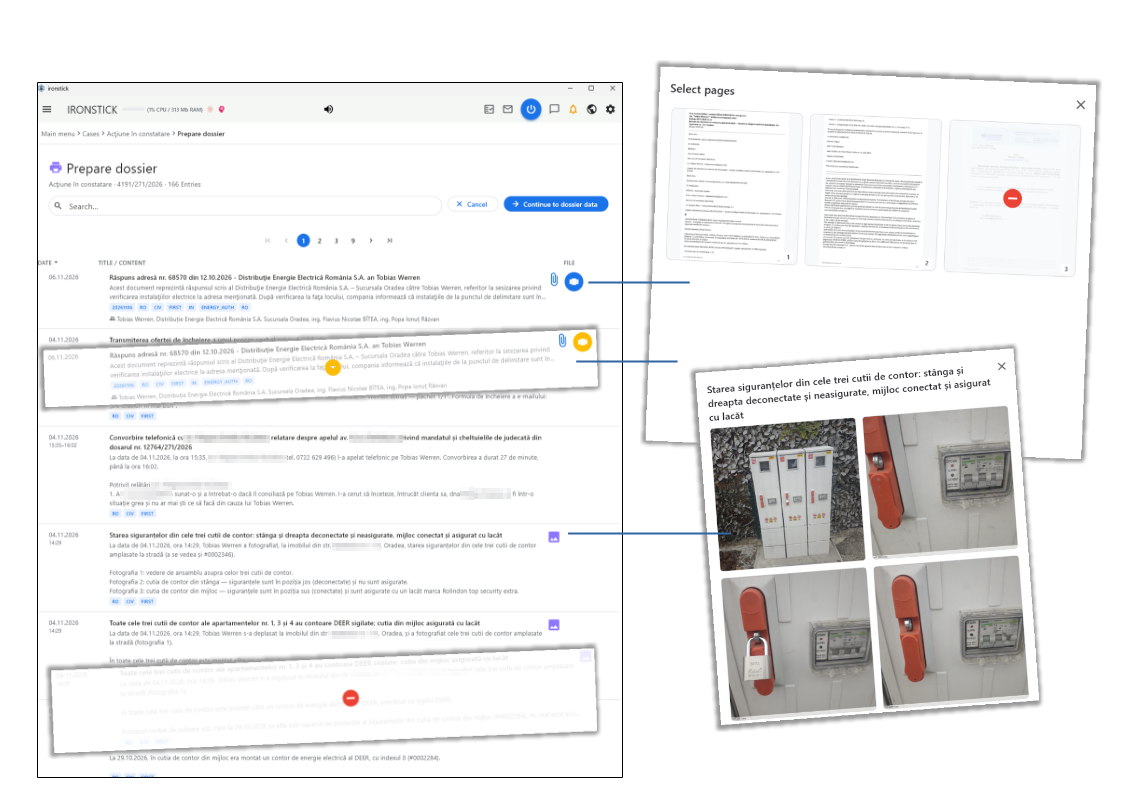
Data Consistency Monitor. Opens the list of suggested changes to your client and contact data that IRONSTICK found in your e-mails. For each suggestion you choose Accept or Reject. The symbol is grey when nothing is waiting and red when there are suggestions. It is also animated when a national court portal has suggested new cases (country-specific function).
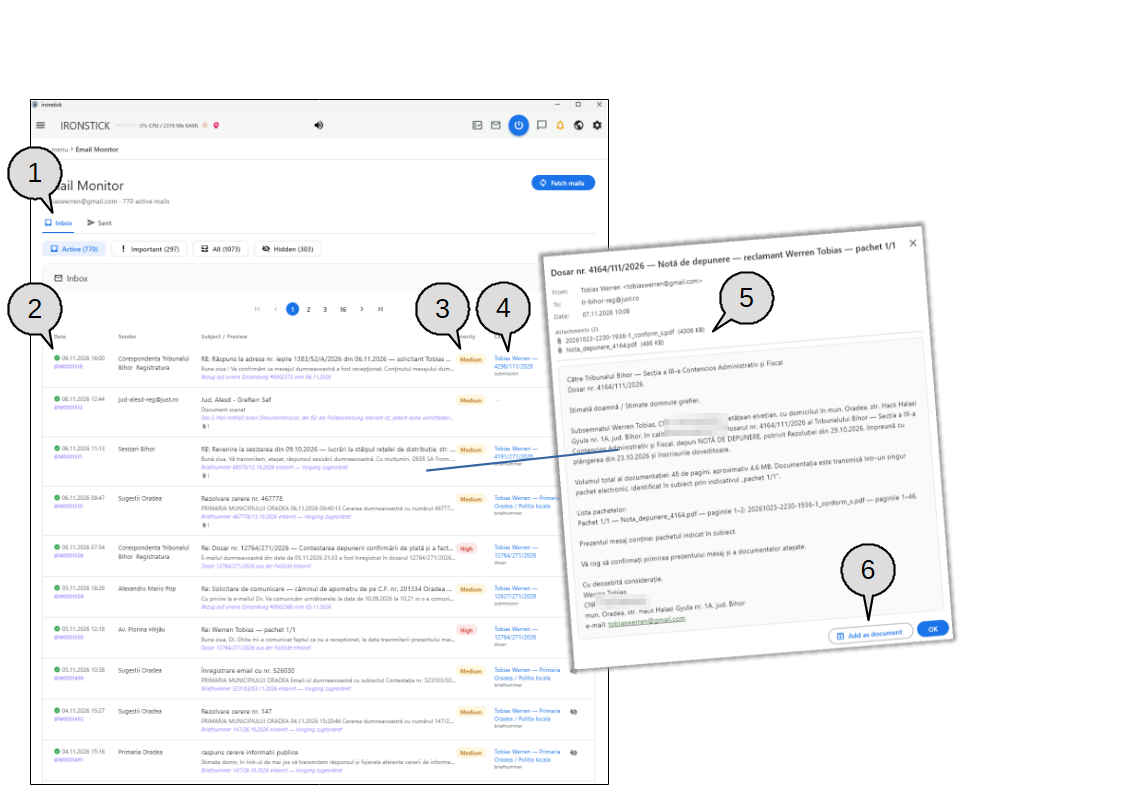
E-mail. Visible only when the background e-mail check is switched on in the configuration. Grey means no new e-mails. Red and animated means new e-mails have arrived, and the tooltip shows how many. Click to open the E-mail Monitor, where everything counts as seen.
AI chat (robot). Click to open the AI chat. On Windows it opens in its own window. If you are inside a case or a client, a small violet dot shows that the chat already knows this case or client. Right-click it (or hold it on the tablet) to switch voice recognition on or off. While it is on, the robot moves and the chat listens and answers aloud. The robot is hidden while an external desktop AI is connected to IRONSTICK. On the tablet it is greyed out when there is no internet.
Server chat. Appears only when IRONSTICK SERVER — the office server — is connected. It opens a chat with the other users of the server. A green dot means the user is online and red means offline. You can delete your own messages, and a switch mutes the chat so that it no longer pops up by itself. The symbol turns red and is animated when there is an unread message.
Deadline bell. Red when at least one deadline is due today or overdue. Orange when deadlines are due in the next ten days. Grey when nothing is pending. Point at the bell to see the number. The bell is also animated when a hearing retrieved from a national court portal is scheduled for today (country-specific function). A click always opens the deadline overview.
Power button. Closes IRONSTICK immediately, without a confirmation prompt. It deletes its temporary files and browser cache and ends IRONSTICK and all processes it started.
Configuration (gear). Opens the configuration screen with the system information, storage location, user profile, AI settings, e-mail account, server connection, signature and letterhead.
What you can do here
IRONSTICK browser window (globe)
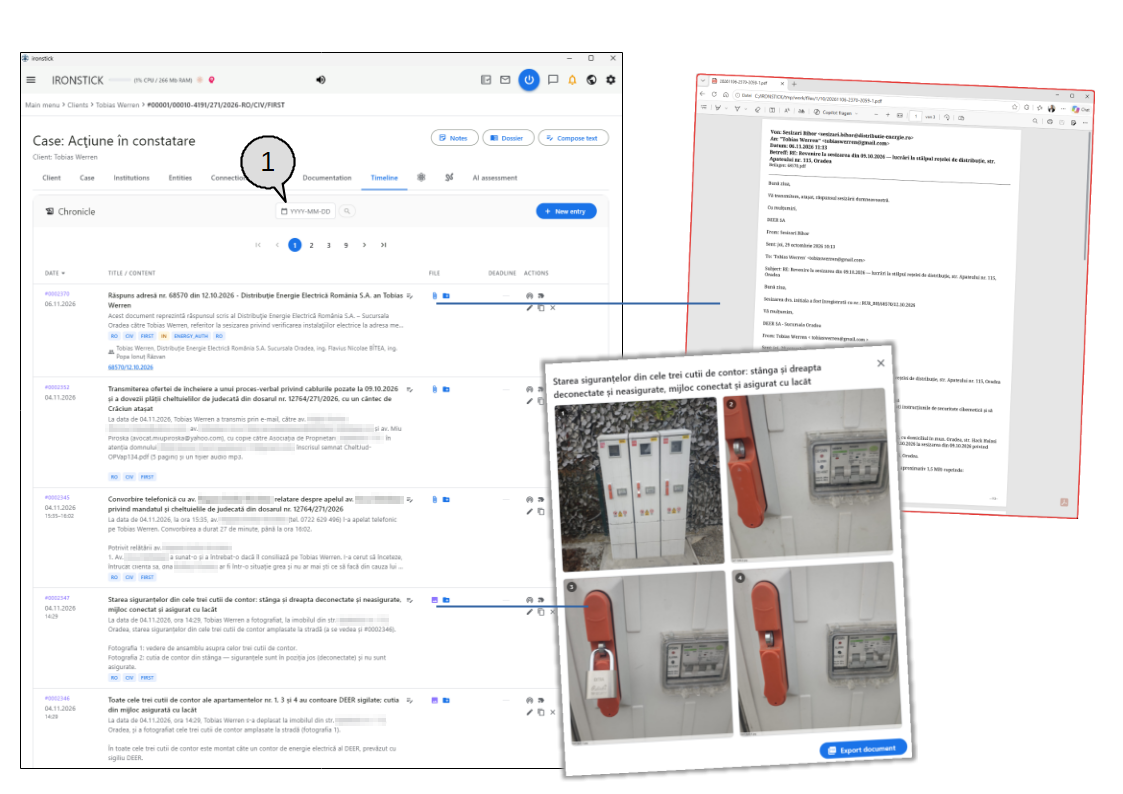
Open the browser window. The globe between the bell and the gear opens the IRONSTICK browser window, which has a red frame so you can always recognise it. While it is open, the globe blinks red. If the window is already open, nothing else happens.
Start page. The start page explains the window, offers quick links to common social networks and shows the latest news from the IRONSTICK website, for example a new program version with its download link.
Let the AI chat read along. Go to the page you want yourself, then write in the chat something like “Look at the current browser window”. The chat reads the page as plain text (no images) and can use it in the conversation. It can also open further pages of the same website and download files from there.
Logins and security checks are yours. You do any logins and “are you human” checks yourself, in this window. The window uses its own browser profile, separate from your usual browser, so on some pages you have to log in once. These logins are kept for next time. For private browsing, use your normal browser.
Symbols that appear only when needed
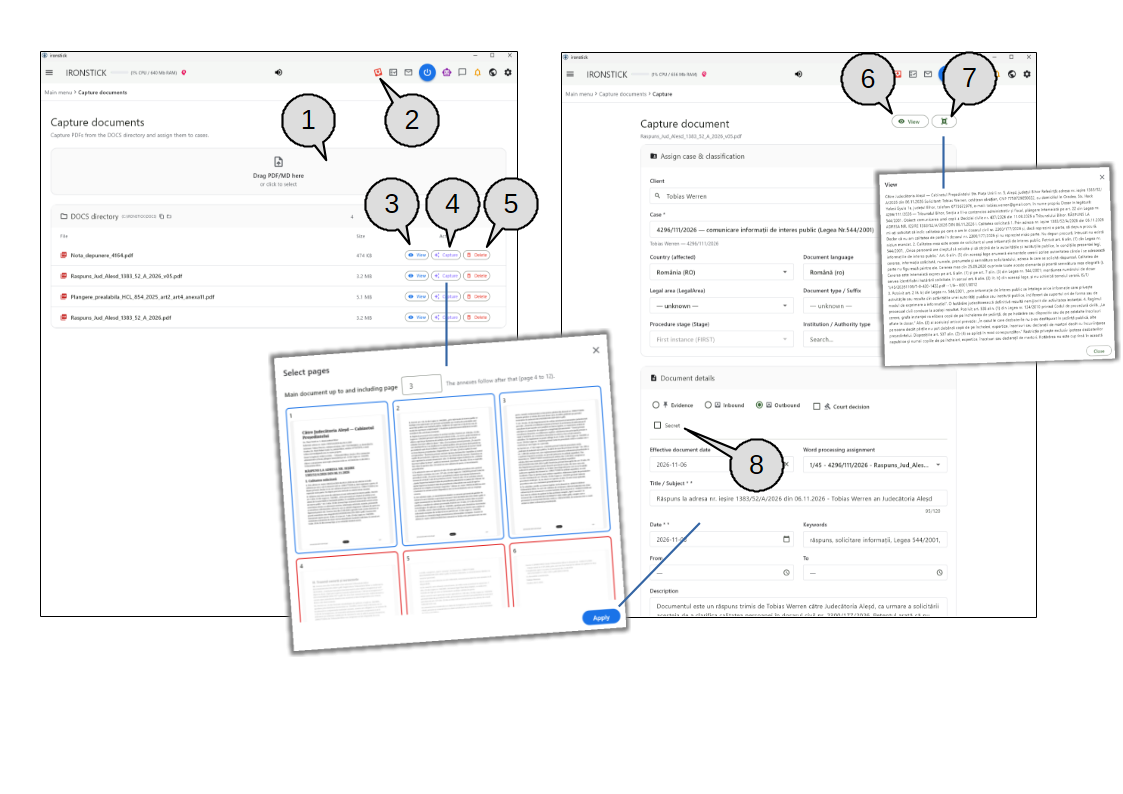
Document inbox (Windows only). A red, animated inbox symbol appears while unprocessed documents are waiting in the document inbox. The tooltip shows how many. Click it to open document capture. When nothing is waiting, the symbol disappears.
Notes pin (IRONSTICK SERVER). When colleagues on the server have left new notes on a case, a red, animated pin appears. Each click takes you to the case with the next unread note and opens its pinboard.
AI service not available. If an external AI service you have set up is currently unavailable, a red circle with an exclamation mark appears. Click it to see, for each service, the reason and when it will be tried again. If a service stopped because its credit has run out, Top up takes you straight to that service in the AI configuration.
Connected desktop AI (Windows only). When an external desktop AI app works with your data, its symbol appears to the right of the resource display. It pulses while a request is running. Point at it to see which cases it has read in this session and how far, whether it has confirmed the IRONSTICK instructions, and how many rule violations it has made.
General behaviour
Move the window. On the PC, drag any empty area of the menu bar to move the program window, just like the normal window title bar.
Locked during long saves. While a long save is running, the menu bar and breadcrumb are greyed out and do not react, and you cannot go back. The screen below stays visible so you can follow the progress.
On the Android tablet. The middle of the bar holds a red DESTROY button instead of the program name. After a confirmation it permanently deletes all IRONSTICK data from the tablet, starts the uninstall of the app and closes it. This cannot be undone. The tablet has no daily briefing and no resource display.
1. Main menu
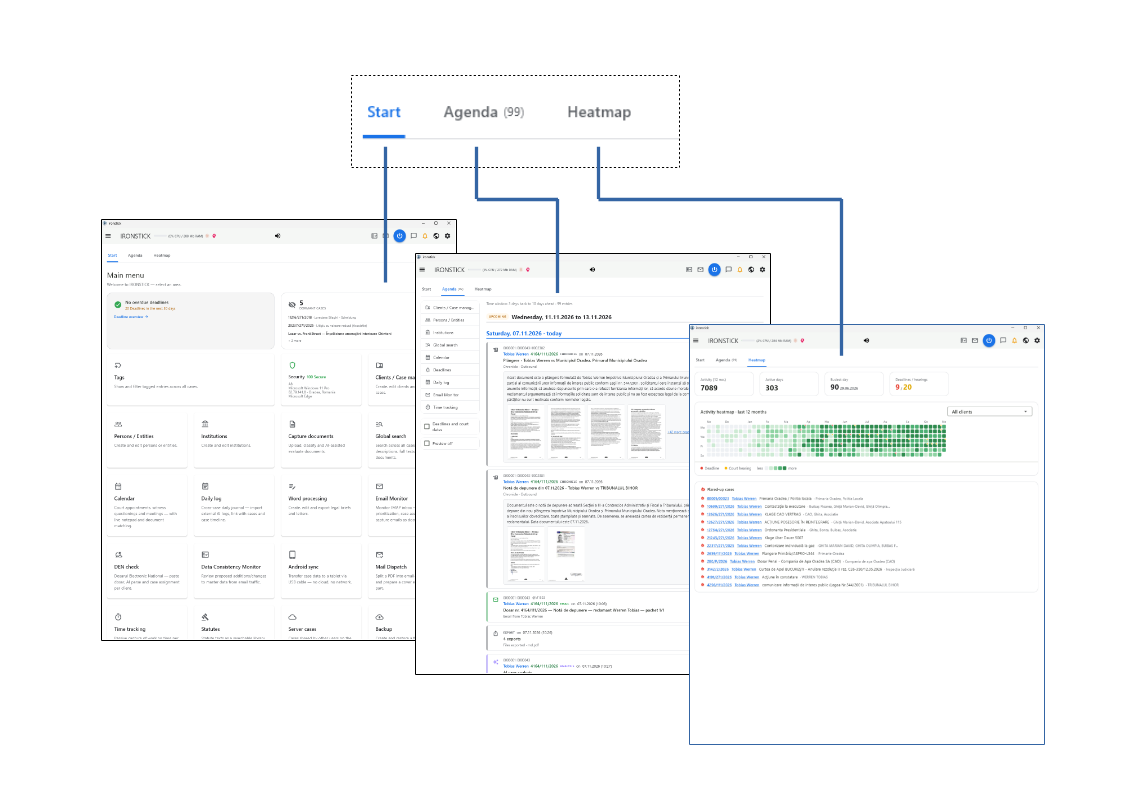
The main menu and its three tabs: Start, Agenda and Heatmap.
The main menu is the first screen after you unlock IRONSTICK. Three tabs sit at the top:
Start shows what needs your attention today and opens every part of the program,
Agenda lists everything that happened across all your cases in date order,
and Heatmap shows how active your practice was over the last twelve months.
What you can do here
Start tab
Deadlines at a glance. The deadline card shows a green tick when nothing is overdue, together with the number of deadlines in the next 30 days. Overdue deadlines appear in red with the first entries listed. Deadline overview opens the full list.
Client birthdays. On a client's birthday, and for two days after it, a cake appears under the deadline card. Click a name to go straight to that client.
Silent cases. The second card counts the cases with no activity for 14 days and lists the first three. Click the card to see all of them, so that no case goes unattended.
Open any module. Every tile opens one part of the program — clients, persons, institutions, document capture, search, calendar, daily log, word processing, E-mail Monitor, time tracking, statutes, backup and more. Each tile carries a short description of what it does.
Arrange the tiles your way. Drag a tile by its handle to a new position. The order is remembered on this computer.
Tags and security. The tags tile shows your coloured tags and opens the tag management. The security tile shows the state of this computer (system, drives, network) and opens the configuration.
Audio. The audio tile opens the audio cutter for recordings you already have; its second link starts a live recording with AI transcription.
Tiles that appear only when they apply.Server cases appears only when IRONSTICK SERVER is connected. Country-specific tiles appear only when those functions are switched on. A few tiles that need a PC (for example document capture and word processing) are not shown on the Android tablet.
Agenda tab
Everything in one timeline. The feed covers three days back and ten days ahead: chronicle entries, e-mails, court dates, deadlines, pleadings, photos and transcripts from all cases. Today is shown in full; the coming and the past days are folded into one bar each. Scroll up to open the coming days one by one; click today's bar to jump back to today.
Every entry links onward. The grey numbers (client / case / document) and the blue client name and green case number each open the matching screen. PDF documents show up to four page previews — click one to page through the whole document. Images open full screen with zoom; attached files open in the IRONSTICK browser window. A daily-log entry opens its full text.
Quick links and filters. The bar on the left opens clients, persons, institutions, search, calendar, deadlines, daily log, E-mail Monitor and time tracking. Tick Deadlines and court dates to see only time-bound entries, or Preview off for a compact text-only list.
Heatmap tab
Key figures. Four tiles show the activity of the last twelve months, the number of active days, the busiest day and the number of deadlines and hearings.
Activity calendar. Each square is one day; the darker the green, the more happened. A red dot marks a deadline, a yellow dot a court hearing. Point at a day to see what happened (chronicle entries, pleadings, e-mails, chat, minutes worked). A click on one of the last three days opens that day in the Agenda.
Per client. The drop-down narrows the whole heatmap to a single client.
Flared-up cases. Below the calendar, cases that suddenly became active are listed. Click the case number to open the case, or the client name to see that client's cases.
Notices on start-up
Daily briefing. On the first start of the day IRONSTICK asks whether you want to hear the daily briefing — a short spoken overview of your day.
IRONSTICK SERVER. If the server is found but this workstation has no access to it, a notice tells you so each time the program starts; you can continue working normally.
2. Configuration
System and database
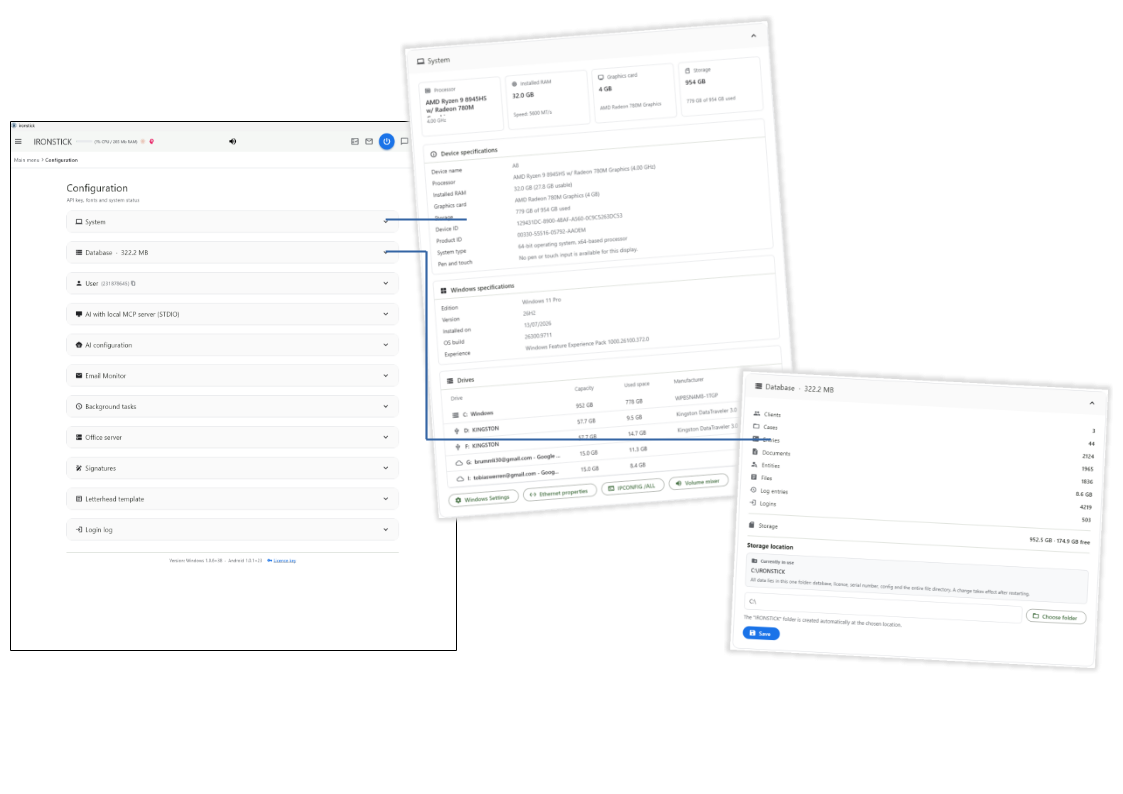
The configuration list with the System and Database cards opened.
The configuration (gear in the menu bar) collects all settings of IRONSTICK on one page, as a list of cards. Click a card's title to open it and click it again to close it. Only one card is open at a time.
The System card shows the details of this computer for support. The Database card shows how much data you hold and where it is stored on disk.
The program version and the licence key are at the bottom of the page.
What you can do here
System (Windows only)
Computer at a glance. Four tiles show the processor, installed memory, graphics card and storage. Below them is the same device and Windows information that Windows shows under Settings › System › About. You can select every value and copy it, for example for a support request.
Drives. A list shows every drive with its capacity, used space and manufacturer. Click a drive to open it in Windows Explorer.
Quick access to Windows. The buttons at the bottom open the Windows settings, the Ethernet network properties, a command window that shows the full network configuration, and the volume mixer.
Database
Your data in numbers. The card title shows the size of the database. Inside, you see the number of clients, cases, evidence entries, documents, entities, files, log entries and logins, as well as the total and free space of the drive.
Currently in use. A grey box shows the folder IRONSTICK is working with right now. All data is in this one folder: database, licence, configuration and every file.
Change the storage location (PC). Use Choose folder to pick a new location, such as a USB stick or a different drive. The IRONSTICK folder is created there automatically. Click Save to start the move. IRONSTICK first tells you how much data will be moved. It then tests the chosen drive (for example its speed, free space and write protection) and only continues if the drive passes. If you confirm, IRONSTICK closes and moves the data the next time it starts.
Data already at the new location. If the chosen folder already holds IRONSTICK data, nothing is overwritten without asking. Both copies are compared, and you choose either to use the copy found there or to replace it with your current data.
On the Android tablet. The data folder is fixed (it is the folder the USB synchronisation copies into), so there is nothing to choose there.
User (PC only)
Your profile. The third card holds your details: company, function, salutation, first and last name, address, country, phone, mobile, e-mail, Facebook, date of birth, and which messaging apps you use (WhatsApp, Signal, Telegram, Viber). Click Save to store them. If you use IRONSTICK SERVER, your date of birth is shared with it for birthday greetings.
Fields taken from your licence. With an active licence, company, salutation and name come from the licence key and cannot be changed here.
Your number. Your user number is shown in brackets next to the card title. The copy symbol puts it on the clipboard, for example for a licence request.
Program language. Choose the language of the program and save. IRONSTICK then reloads in the new language and returns to the main menu. An open chat window closes and opens in the new language next time.
Desktop AI and AI configuration
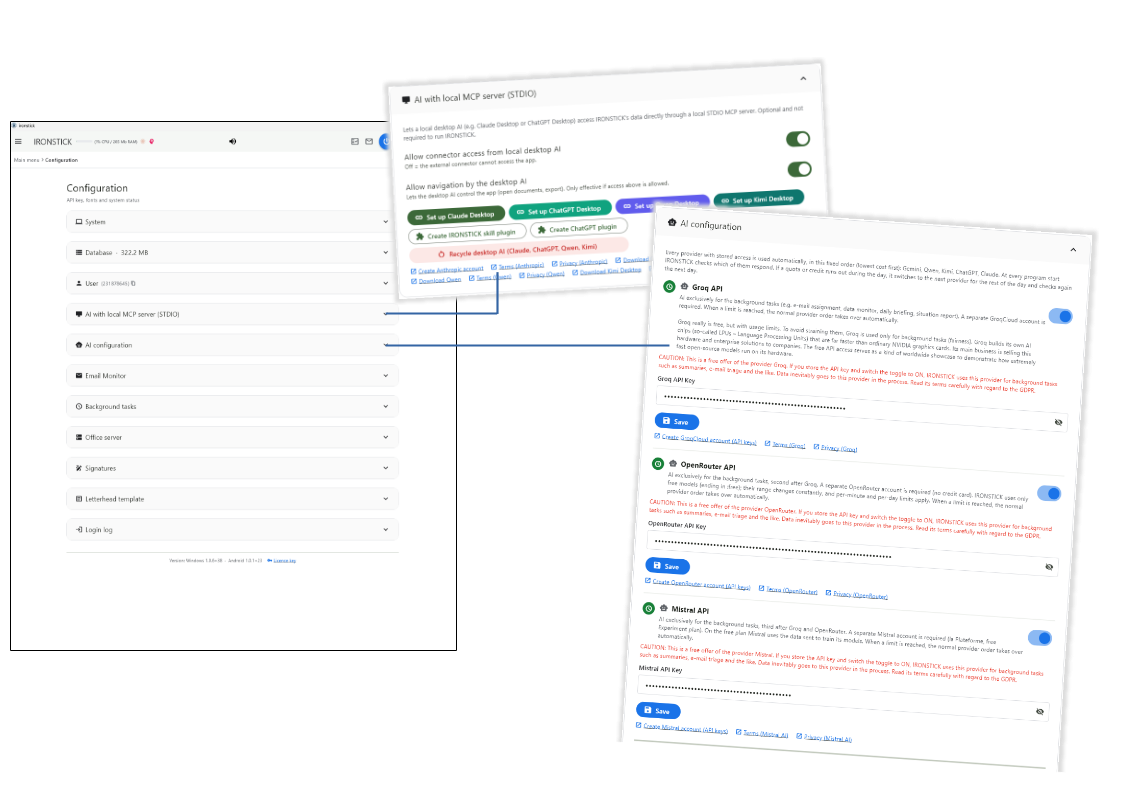
The cards for connecting a desktop AI app and for the external AI services.
These two cards control how AI works with your data. AI with local MCP server lets an AI app installed on this computer reach your IRONSTICK data directly. This is optional and not needed to run the program.
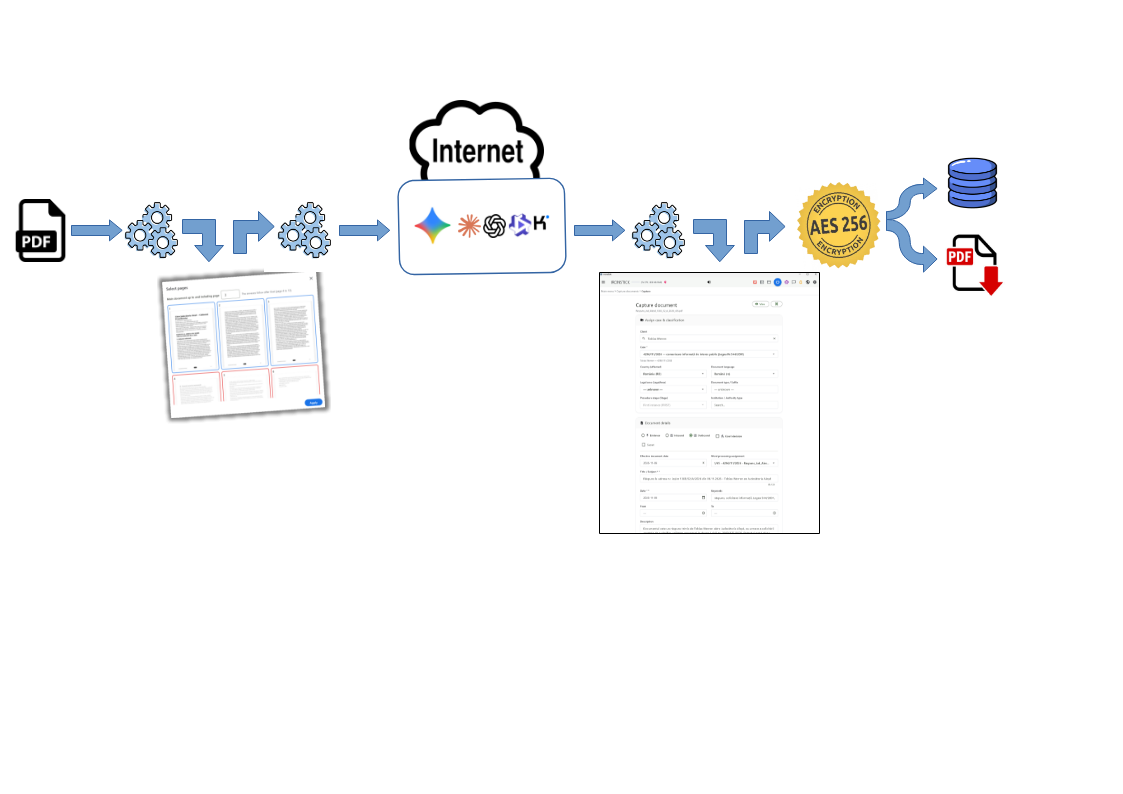
AI configuration is where you enter your access keys for the external AI services that IRONSTICK uses for its AI functions and background tasks.
What you can do here
AI with local MCP server
When the card appears. The card is shown on the PC only, and only when at least one desktop AI app is part of your licence.
Allow access. The first switch decides whether the connected desktop AI may access IRONSTICK at all. When it is off, the external connector cannot reach the program.
Allow navigation. The second switch lets the desktop AI control the program, for example to open documents or start an export. It only works when access is allowed.
Set up an app. There is one coloured Set up … button for each licensed desktop AI app. A click registers IRONSTICK in that app and explains the remaining steps, usually restarting the app. For Qwen Desktop, the setup text is copied to the clipboard and you paste it into the app's own settings dialog.
Skill plugins.Create IRONSTICK skill plugin and Create … plugin build a skill package for the desktop AI app. A message shows where the file was saved, so you can drag it into the app.
Recycle desktop AI (Windows). The light-red button closes the listed desktop AI apps and restarts them after you confirm. Use it when an app has lost its connection to IRONSTICK.
Links. The links below the buttons open the download page, terms of use and privacy policy of each app in the IRONSTICK browser window.
AI configuration
Automatic order. You do not pick one service. Every service with a stored key is used automatically, in a fixed order with the cheapest first. If a service fails, IRONSTICK passes the request to the next one. The failed service is tried again after a waiting time that depends on the error; it is skipped for the rest of the day only when its credit is used up or the cause is unknown.
Status badge. The round badge in front of each service shows its place in the order. Green means available, red means currently unavailable, and grey means no key is stored. Point at a red badge to see the reason and when it will be tried again.
Free services for background tasks. The services above the thick line are free offers used only for background tasks, such as e-mail prioritisation, the data monitor, the daily briefing and the situation report. Their badge shows a clock. Each has its own on/off switch, and a red caution text reminds you that your data goes to that provider. Read its terms carefully with regard to data protection (GDPR) before you switch it on.
Paid services. The services below the thick line are used in the order shown. Their switch Allow Red/Blue Team makes the AI read a finished pleading a second time as a critical reviewer and mark anything not supported by the text. Substantial findings hold the result back. The switch can only be used once a key for that service is saved.
Enter a key. Paste the access key into the key field and click Save. The eye symbol shows or hides the key. The order and badges update straight away.
Account links. Under each service there are links to create an account and an access key, to check your balance (for some services), and to read the terms and privacy policy. They open in the IRONSTICK browser window.
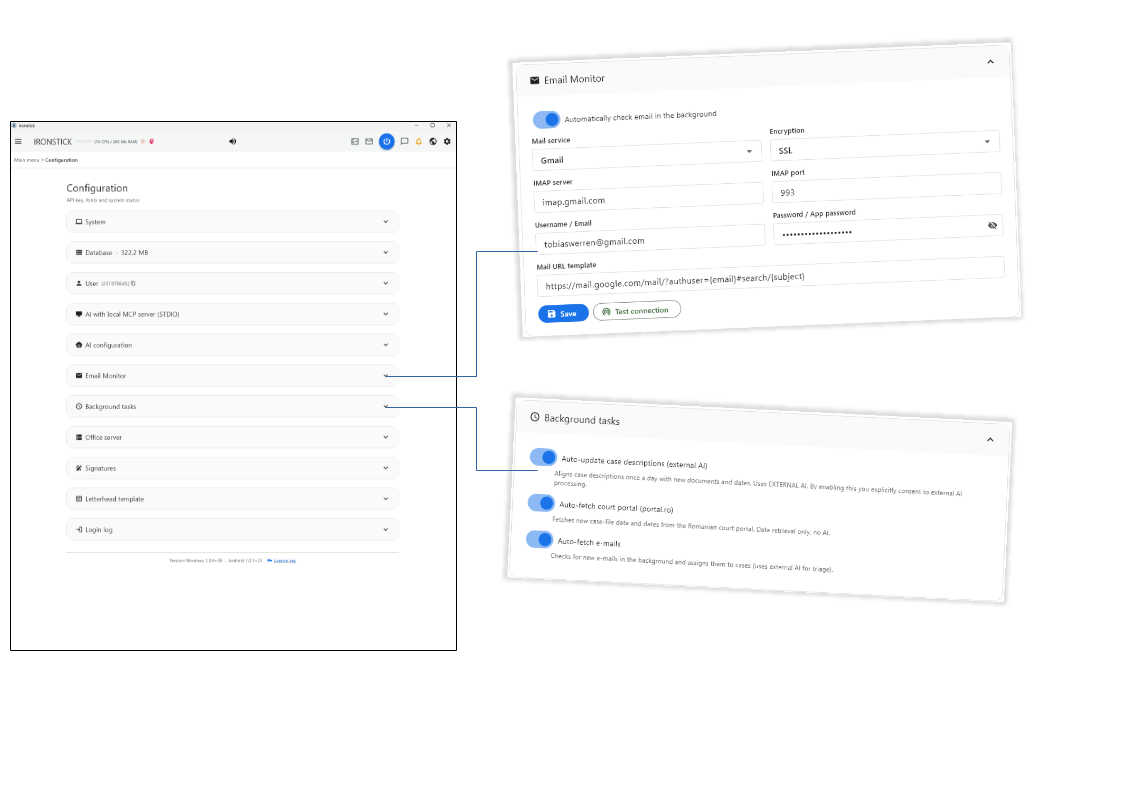
E-mail Monitor and background tasks
The e-mail account settings and the switches for automatic background tasks.
In E-mail Monitor you connect your mailbox so that IRONSTICK can pick up new e-mails and assign them to your cases.
Background tasks collects the jobs that run automatically, with one switch each, so you decide what may run on its own and which tasks may use external AI.
What you can do here
E-mail Monitor
Background check. The switch at the top turns the automatic e-mail check on or off. When it is on, mail is checked at program start and every five minutes after that, and the e-mail symbol appears in the menu bar. When it is off, neither happens.
Choose your mail service. Pick your provider from the list (for example Gmail, Outlook / Hotmail, Yahoo, GMX, Web.de, T-Online, Bluewin or ProtonMail) and the server, port and encryption are filled in for you. For any other provider, choose Other and enter the details by hand.
Login. Enter your user name or e-mail address and your password. Many providers require a separate app password. The eye symbol shows or hides it.
Mail URL template. The web address used to open an e-mail in your webmail. The placeholders {email} and {subject} are filled in automatically.
Save and test.Save stores the settings. Test connection logs in to your mailbox and reports either the number of messages in your inbox or the error.
Background tasks
Auto-update case descriptions (external AI). Once a day, brings case descriptions up to date with new documents and dates. This uses external AI. By switching it on, you explicitly agree to external AI processing.
Auto-fetch court portal. Fetches new case-file data and dates from the national court portal. It only retrieves data and uses no AI. This country-specific switch appears only when the country functions for Romania are active.
Auto-fetch e-mails. Checks for new e-mails in the background and assigns them to cases; external AI only rates their urgency. This is the same switch as at the top of the E-mail Monitor card.
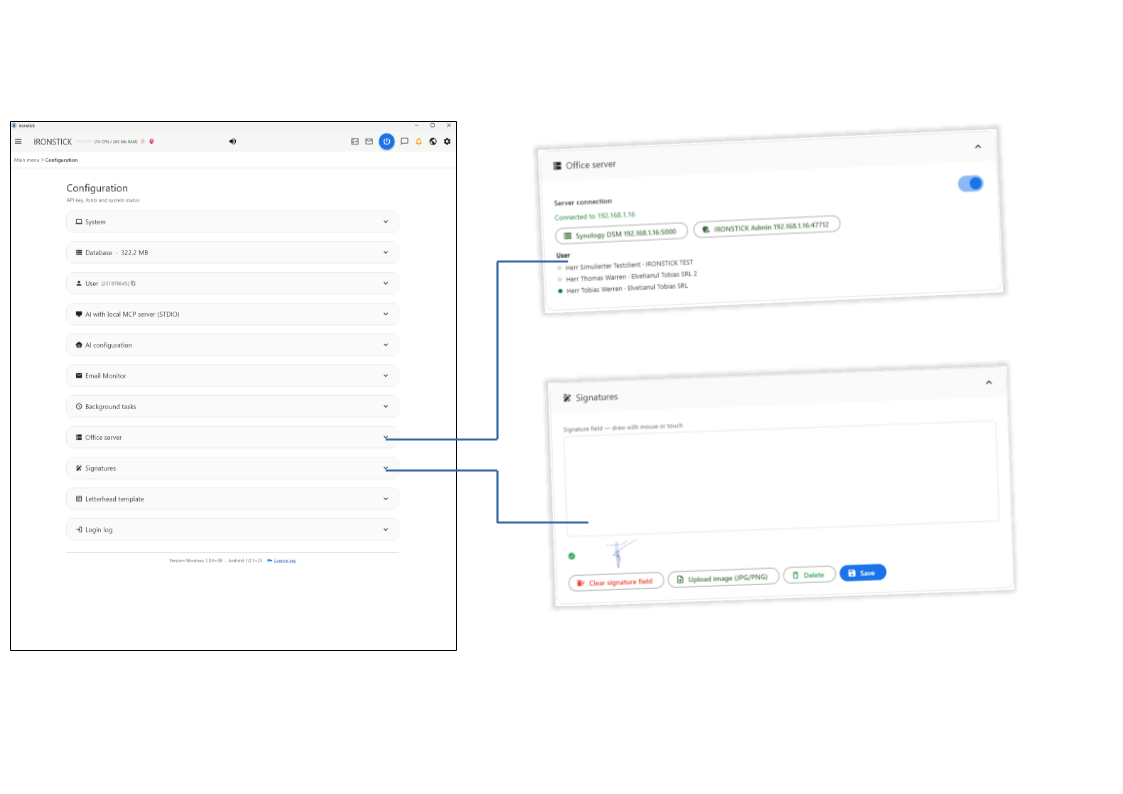
Office server and signatures
The connection to IRONSTICK SERVER and the signature field.
Office server connects this workstation to IRONSTICK SERVER — the office server of your firm — and shows who else is working on it.
In Signatures you store your handwritten signature, which IRONSTICK can place in your documents. Below these cards are the letterhead template, the login log and the version line.
What you can do here
Office server
Server connection. The switch turns the connection on or off. The search for the server only runs while it is on. The status line shows whether you are connected, whether access has been requested and is waiting for approval, or whether no server was found. The rest of the card is greyed out until you are connected.
Server pages. When connected, click the green status line to open the server's web page. Two buttons open the server's storage management page and the IRONSTICK SERVER administration. Each page requires its own credentials.
Users. The list shows every user registered on the server. A green dot means the user is online.
Signatures (PC only)
Draw your signature. Sign in the white field with the mouse, a pen or a finger, then click Save. Clear signature field wipes the drawing so you can start again.
Upload a signature.Upload image (JPG/PNG) stores a scanned signature instead.
Stored signature. A green tick and a small preview show the signature that is currently stored. Delete removes it.
Letterhead template (PC only)
Upload your letterhead.Upload template takes an A4 portrait PDF with your office letterhead. In the window that opens, drag the red line (or click) to the bottom edge of the letterhead, then save. The text of your pleadings starts below this line.
Check and adjust. A preview shows the stored letterhead. The switch Letterhead on first page only prints it on the first page only instead of on every page. Remove template deletes it.
Login log and version
Login log. The last card lists the latest 50 logins, newest first: time, user number, external and internal IP address, place, country, device, operating system, browser and a security rating. You can select the text, or copy the whole table with the copy symbol.
Version. The line at the bottom of the page shows the version of the Windows program and of the Android app stored in your data folder.
Licence key (PC). Click Licence key to enter a new or renewed key and click Activate. If the key is invalid, expired, not yet valid or belongs to another user, you are told why. Request licence key prepares a ready-made request. After activation you set up your authenticator app again by scanning the QR code shown, and the licensed modules are unlocked straight away.
3. Clients
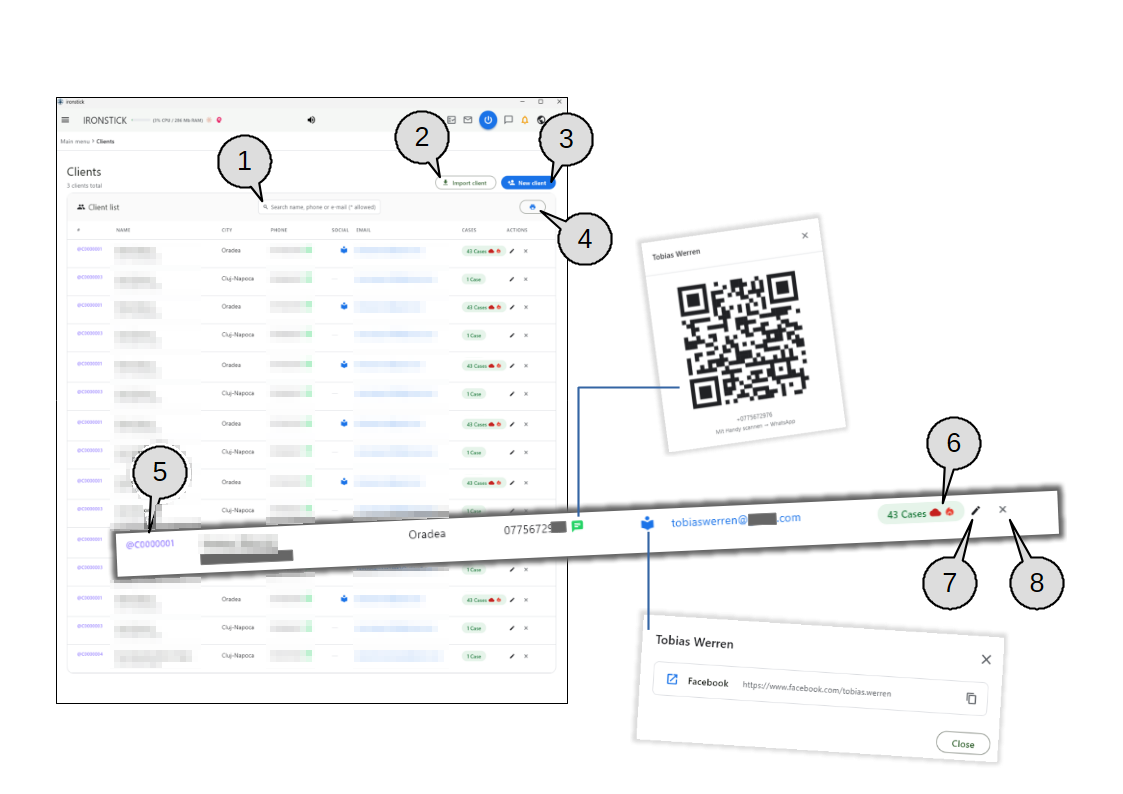
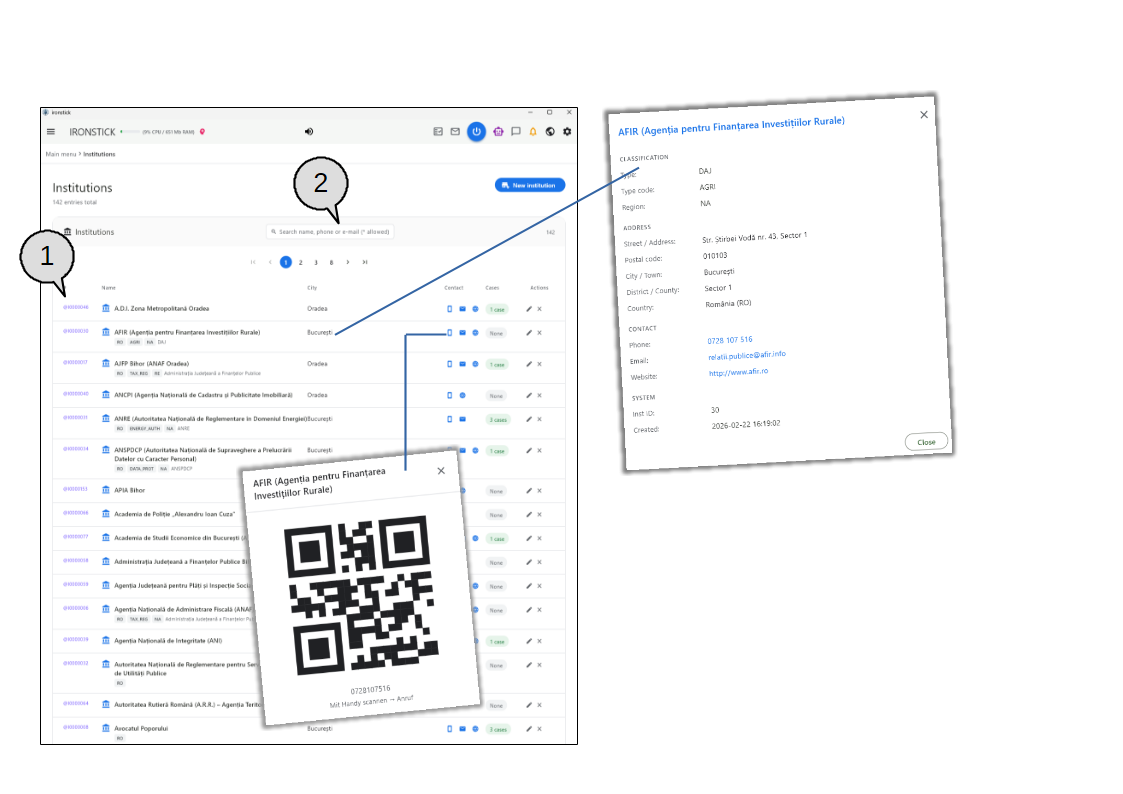
The client list, with the QR code and social media windows that open from a row.
The client list is where all your clients are kept. Each row shows the client's reference number, name, city, phone, social media, e-mail and number of cases.
From here you create new clients, import existing contacts, print the list and open a client's cases.
The picture also shows the QR code window that opens from the WhatsApp symbol, and the social media window that opens from the social symbol.
Search. Narrows the list while you type. It searches names, phone numbers and e-mail addresses; an asterisk (*) works as a wildcard.
Import client. Imports clients from a CSV file or a vCard file.
New client. Opens an empty client form.
Print list. Creates a PDF of the whole client list, which you save to your Documents folder or into Google Drive.
Client reference. The purple number (for example @C0000001) is the client's reference number. Click it to copy it to the clipboard, for example to paste it into the chat or a document.
Cases. The number of cases of this client. A red cloud means at least one case is shared via IRONSTICK SERVER; a red flame means at least one case has flared up recently.
Edit. Opens the client form with this client's details.
Delete. Removes the client after a confirmation.
What you can do here
Find a client
Search as you type. The search checks first and last names separately and also finds names that sound alike, so small typing errors still give a result. Accents are ignored, so "Francois" also finds "François".
Phone and e-mail. Type part of a phone number (spaces and dashes do not matter) or part of an e-mail address. If you type several words, a client must match all of them.
Clear the search. The small X in the search field shows the full list again. If nothing matches, the list says so.
Most urgent first. Clients with a flared-up case are at the top, then clients with the most cases, then those with the most recent activity, then alphabetically.
Several pages. With more than 25 clients the list is split into pages; page navigation then appears above and below the list.
Birthdays. On a client's birthday, and for two days after it, a small cake appears in front of the name. If you came here by clicking a birthday name in the main menu, the list shows only the clients who have a birthday right now.
Work with a client row
Open the cases. Click anywhere on a row to open that client's case list.
Call, WhatsApp or e-mail by QR code. Click the phone number, the green WhatsApp symbol or the e-mail address. A window shows a QR code that you can scan with your phone to call, open WhatsApp or write an e-mail. A click on the QR code opens the matching program on this computer; if there is none, the value is copied to the clipboard.
Social media. The blue symbol in the Social column appears only when profiles are recorded. It opens a window listing Facebook, Instagram, TikTok, LinkedIn and X profiles. The open symbol shows the profile in the IRONSTICK browser window (on the tablet: in the system browser); the copy button copies the address.
Copy the reference number. A click on the purple @C number copies it, for example to paste it into a chat or a document.
Delete a client. The X opens a confirmation. If the client still has cases, documents or case links, a yellow warning lists them before you confirm. Notes that the AI has remembered about this client are removed as well.
Print the client list
PDF of all clients. The print button in the card header creates a client list as PDF. In the export window you can save it to your Documents folder, or into a Google Drive folder if Google Drive is installed on this computer.
Create or edit a client
Master data. Name (required), personal identification number, nationality, language and birthday. Choosing a nationality also pre-selects the matching language. The birthday is picked from a calendar and can be cleared with the X.
Address. Street, postcode, district/county, city and country.
Geo-coordinates. Turn on the switch to place the client on a map. IRONSTICK looks up the address automatically; you can correct the search text and search again, type latitude and longitude yourself, or simply click the map to set the point.
Contact. Phone (tick WhatsApp if the number uses WhatsApp), e-mail and a free text field for details. An invalid e-mail address is reported before saving.
Bank details and social media. Bank name and IBAN; addresses of the Facebook, Instagram, TikTok, LinkedIn and X profiles.
Save or cancel. The buttons at the bottom save the client or leave the form without changes. When editing, the client number and the creation date are shown under the title.
Import clients
Drop a file.Import client opens a window with a drop area. Drag a CSV file or a vCard file (for example exported from your phone or mail program) onto it.
Assign columns (CSV only). A second window lists every column of the file with a sample value and the field it will go into. The assignment is pre-filled; change any field with the drop-down or choose not to import a column. Continue becomes available once one column is assigned to the name.
One contact. If the file contains a single address, the New client form opens already filled in, so you can check, complete and save it yourself.
Several contacts. You get a list with a tick box for each contact; all are ticked in advance. Contacts that already exist as clients are not ticked and are marked as already present. Import creates all ticked clients in one step and shows how many were added.
When something goes wrong. If the file cannot be read or contains no address, the window tells you. If the import fails, nothing is changed.
4. Cases
The case list of a client
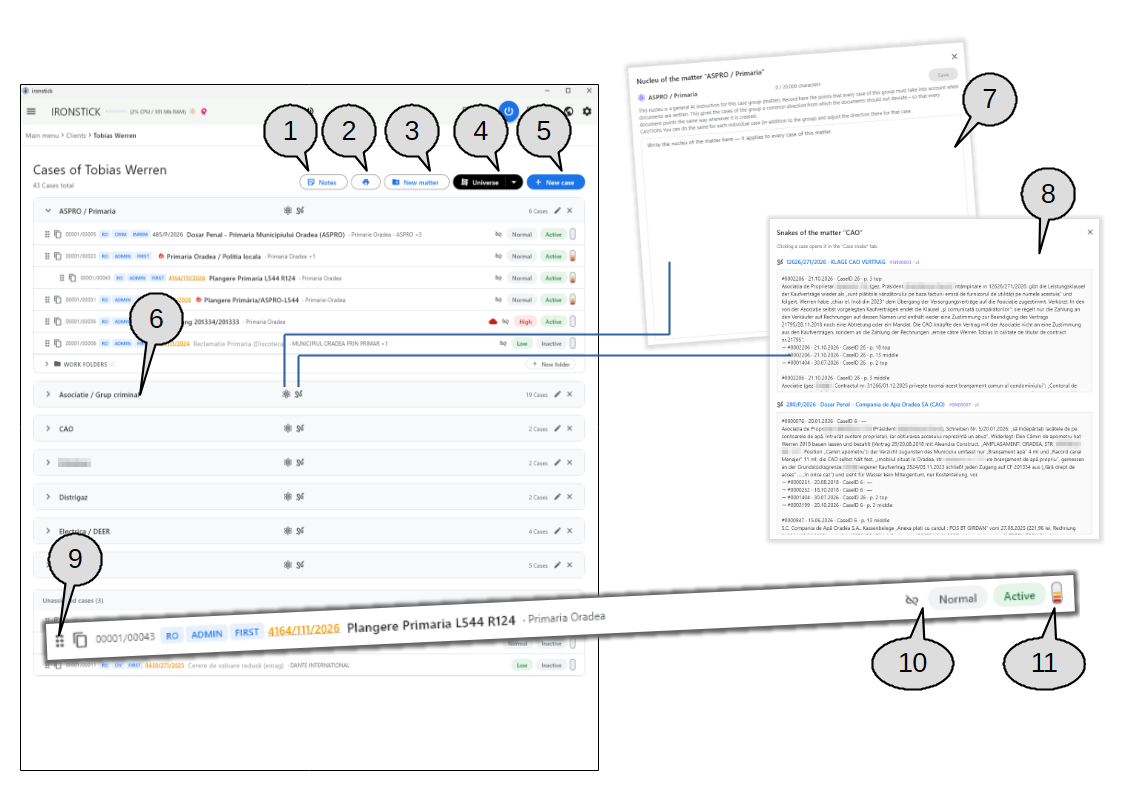
A client's cases, grouped into matters, with the nucleu and snakes windows of a matter.
This screen shows all cases of one client. Cases that belong together are grouped into matters (for example all proceedings against the same opponent); cases not yet placed in a matter appear under Unassigned cases.
You can create matters, sort cases into them by drag and drop, and see each case's priority, status and chances of success at a glance.
The picture also shows the nucleu window and the snakes window that open from the two symbols in a matter's title bar.
Notes. Opens the notes board for this client.
Print. Creates a PDF overview of all this client's cases, with or without an AI summary of the latest status.
New matter. Creates a new group for cases that belong together.
Universe. Shows the client's cases as a network, as a 3D map or a 2D map. Available once the client has three or more cases.
New case. Opens the form for a new case of this client.
Matter. The title bar of a matter. Click it to fold or unfold the matter. The two symbols in the middle open the nucleu and the snakes of the matter; on the right you see the number of cases, rename (pencil) and delete (X).
Nucleu of the matter. A general AI instruction that applies to every case of this matter. Write here what every document written for these cases must take into account, then save.
Snakes of the matter. The snakes of all cases in this matter, in list order. Click a case to open it on its snake tab.
Drag handle. Grab the dotted handle and drag the case into a matter, or drop it onto an existing case to make it a sub-case of that case.
Remove from matter. Takes the case out of this matter. The case itself is kept and appears under Unassigned cases unless it is also in another matter.
Chances of success. A small gauge showing the result of the latest AI assessment of the case. Point at it to read the percentage; click it to open the case on the assessment tab.
What you can do here
Read a case row
Open a case. Click a row to open the case on its Timeline tab.
Numbers and tags. Each row starts with the client/case number, followed by blue tags for country, area of law and procedural stage. Point at a tag to see its full name.
Case number in orange. If the case was found on a national court portal (country-specific function), the court case number is shown in orange. Click it to see the portal details: court, section, subject, parties, legal remedies and all hearings with their results. From there you can also open the case.
Title and opponent. The case title is followed by the opponent in grey; with several opponents only the first is shown, plus the number of others. Inactive cases are shown in light grey.
Flame. A red flame marks a case that has flared up recently.
Priority and status. The first pill shows the priority (Urgent and High in red, Normal in grey, Low in green); the second shows the status (Active in green, Paused in red, Inactive in grey).
Cases of another client. If a case belongs to a different client of yours who is on the same side in the proceeding, the row shows Original file with that client's number and name, and the role in an amber pill. Click the number to go to that client's case list.
Red cloud. Appears when IRONSTICK SERVER is connected and the case is shared there. Click it to open the case on its case tab.
Organise cases into matters
Create, rename, delete.New matter asks for a name. The pencil in the title bar renames the matter; the X deletes it after a confirmation. Deleting a matter never deletes its cases; they simply return to Unassigned cases unless they are also in another matter.
Fold and unfold. Click a matter's title bar to hide or show its cases.
Move a case. Drag a case by its dotted handle into another matter. The matter you drag over lights up blue.
Make a sub-case. Drop a case onto the middle of another case to place it underneath; sub-cases are shown indented. Drop it above or below a case (a blue line shows the spot) or on an empty part of the matter to keep it as a main case.
Same case in two matters. Drag the double-sheet symbol instead of the handle to add the case to a further matter. It then appears in both.
Take a case out. Use the unlink symbol in the row, or drag the case by its handle onto Unassigned cases.
Work folders
Folders per matter. Under each matter, Work folders unfolds a list of folders. New folder creates one; each folder can be renamed or deleted.
Contents. Entries you assign to a work folder from inside a case are listed with their date, title and case number. The X next to an entry removes it from the folder.
Nucleu and snakes of a matter
Nucleu. The atom symbol opens the nucleu of the matter: a text of up to 20,000 characters that tells the AI what to keep in mind for every case of this matter. Each save keeps a new version. A case can additionally have its own nucleu, set in the case itself. If you close the window with unsaved changes, IRONSTICK asks whether to discard them.
Snakes. The snake symbol opens the snakes of all cases in the matter. A snake records the statements of the opposing side that are contradicted by documents, with the place where each was found and the documents that contradict it. Click a case title to open that case on its snake tab. If no case has a snake yet, the window says so.
Print, new case and more
Case overview as PDF. The print button asks whether you want the overview with or without the latest status written by the AI. If you choose the AI version and it uses external AI, you are asked for consent first. The PDF is then saved to your Documents folder or to Google Drive.
New case. The form asks for a title (required), priority and status. Tick Claimant is the client to fill in the client's name automatically, or type another claimant, and enter the opponent.
Other clients in the same proceeding. If you have further clients, you can search them by name or @C number and add them to the case. The case then also appears in their case lists.
Conflict of interest check. As soon as your own side and the opponent are filled in, this button compares the names with your own clients, parties and cases and shows the result. Nothing leaves this computer.
Further options. Mark a case as public (reported in the media), or lock it so that no other case can be linked to it, whether by hand, automatically or by the AI.
Legal details. Entering a court case number ticks has a case number and sets today's date, which you can change. Choose the country first; the areas of law and procedural stages for that country are then offered. A free description field completes the form.
Subscribed cases. When IRONSTICK SERVER is connected and you follow cases of a colleague, they appear in their own card with a blue cloud, the owner's name and the owner's last change. Click one to open it.
No cases yet. A client without cases shows a short notice with a New case button.
Notes and the case universe
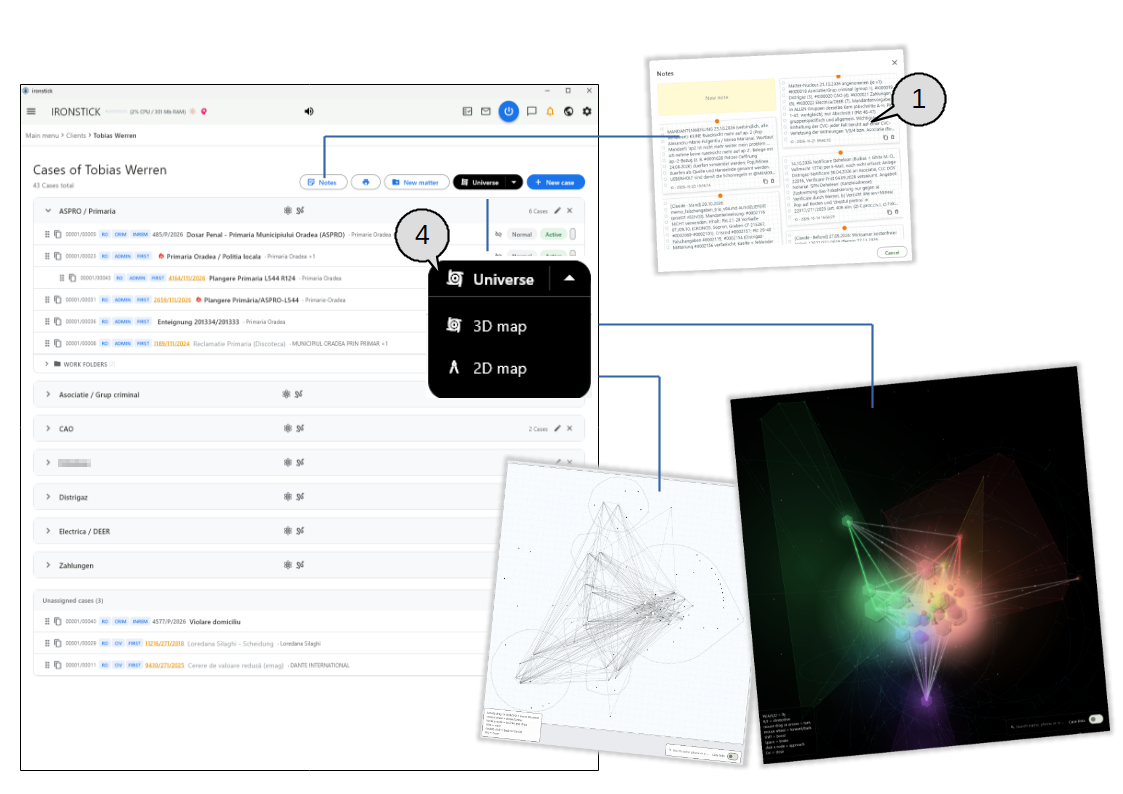
The notes board and the two network views of a client's cases.
Two buttons above the case list open tools that work across all of the client's cases.
Notes opens a notes board for the client. Universe shows how the client's cases are connected: as a 3D map you can fly through, or as a 2D drawing on squared paper.
The picture shows the notes board, the opened Universe menu and both maps.
Notes. The notes board of the client, with your own notes and the AI's notes for this client.
Universe menu. Point at or click the button to choose 3D map or 2D map.
What you can do here
Notes board
Add a note. The first, pale yellow card New note opens a text field (up to 1,000 characters) with an optional date. Save pins the note to the board; the newest notes are at the top.
Three kinds of notes. Yellow notes are your own; click one to edit it. AI notes appear on squared paper: entries the AI has remembered for this client. White cards are notes from colleagues who follow a shared case via IRONSTICK SERVER.
Copy and delete. Each note has a small copy button and a delete button. A note with a date shows it with a small alarm clock.
Notes from the case list belong to the client. Notes opened here are not tied to a single case.
3D map (universe)
What you see. Each case is a hexagon, institutions are triangles. Cases are linked when they share persons, companies or institutions, when a document of one case is referred to in the other, or when one case mentions the other's case number. Cases of the same matter form a coloured cloud.
Building the map. The map builds up in front of you while a progress bar runs. The line at the top left shows the number of cases, connections and matters.
Fly through it. W/A/S/D move forward, back and sideways, R/F up and down; the arrow keys or dragging with the mouse turn the view. Shift moves faster, the space bar slows down, and the mouse wheel moves forward or back. The panel at the bottom left lists the keys; the bar at the bottom right shows your speed.
Mark and fly to a point. Click a case or institution: the view flies to it and it stays marked, together with its connections and the reason for each connection. Click it again to remove the mark.
Open from the map. Double-click a case to open it. Double-clicking a person or company opens the person list, and an institution opens the institution list; the entry is highlighted in yellow there.
Search. The search field at the bottom right finds a name, phone number or e-mail and marks the best match, just like a click.
Show persons and companies. The Case connections switch adds the persons and companies of the cases to the map. It starts switched off; institutions are always shown.
Close. The X at the top right or the Escape key closes the map.
2D map
A drawing on squared paper. The same network is drawn flat, like a technical drawing. Names appear when you point at a point or mark it.
Move and zoom. Drag with the mouse, or use W/A/S/D or the arrow keys, to move the sheet. The mouse wheel zooms towards the pointer.
Mark, open, search. A click on a point moves it to the centre and marks it (it pulses); a click on empty paper removes the mark and zooms out. Double-click opens the case, person or institution. The search field marks the best match; the Case connections switch adds the persons and companies of the cases.
Close. The X at the top right or the Escape key closes the map.
5. Case
Case tab, sharing and handing over
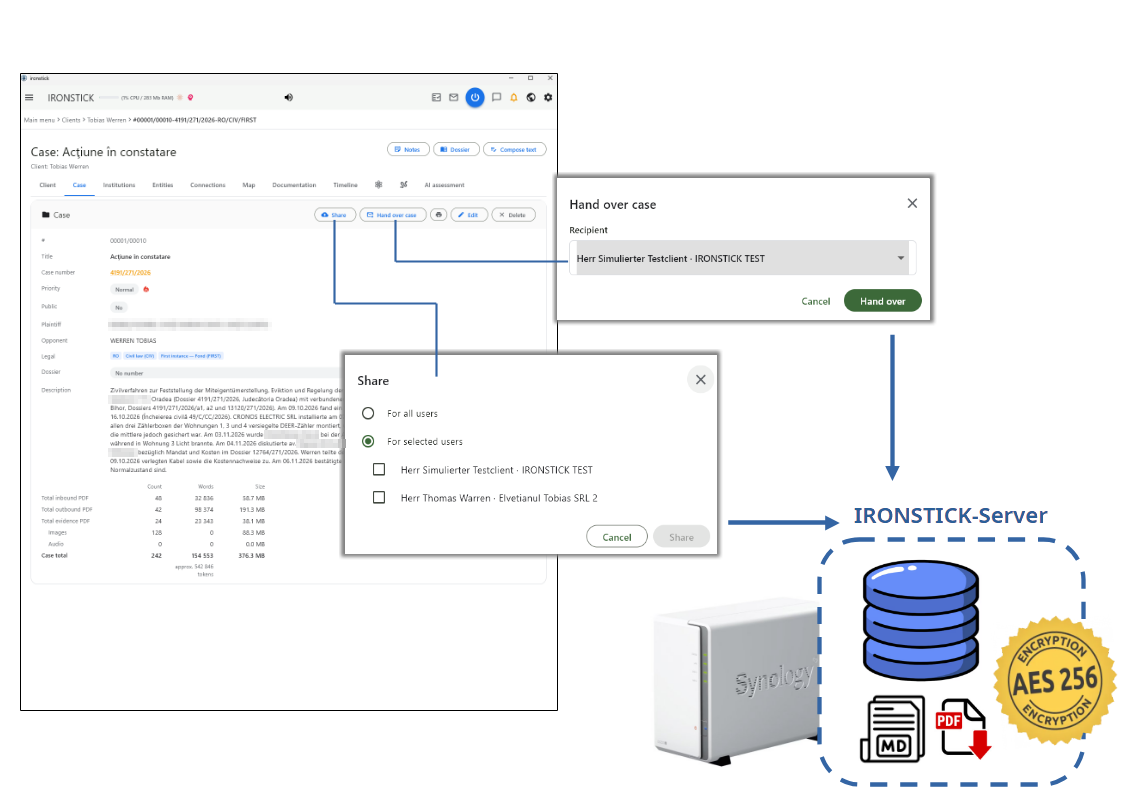
The Case tab with the dialogs for sharing a case and handing it over through IRONSTICK SERVER.
The case screen holds everything that belongs to one case. At the top you see the case title and the client, three buttons (Notes, Dossier, Compose text) and a row of tabs. The picture shows the Case tab with the case data and a summary of the files in the case.
When IRONSTICK SERVER is connected, a case can be shared with colleagues or handed over to another user; the two dialogs in the picture appear for this.
What you can do here
Header and navigation
Breadcrumb. The path at the top leads back to the main menu, the client list or the client's case list. The last part shows the case number together with country, area of law and stage.
Cloud in front of the title. A red cloud means you have shared this case via IRONSTICK SERVER; a blue cloud means it is a case someone else shared with you. Click the cloud to jump to the Case tab.
Moving between tabs. Click a tab to switch. If you leave the case nucleu or case snake tab with unsaved changes, IRONSTICK asks whether to discard them.
Case data
Number, title and case number. The card shows the internal client/case number, the title and the official case number. If a court-portal file is linked to the case, the case number appears in orange with a dotted underline; click it to open the portal file details (country-specific function).
Priority and activity. The priority you set appears as a coloured label. A small red flame next to it shows that the case has recently flared up (new deadlines, hearings, entries or e-mails in the last 14 days); it never changes your own priority.
Parties and legal classification. Public yes/no, claimant (marked if it is your client), opponent, country, area of law and stage, whether a court file number has been assigned (with its date), case type, start date and the description.
Size of the case. Below the description a table counts the inbound, outbound and evidence PDFs, images and audio files, with number of words and file size, a case total and an estimate of how much text the AI would have to read.
Buttons on the Case card
Print. Choose Chronology or Documentation and the case is exported as a PDF.
Edit. Opens the case form: title, priority, status, claimant (or Claimant is the client), further own clients in the same proceedings, opponent, a conflict-of-interest check (active once both sides are filled in), public case, a switch that stops anything from being attached to this case (by hand, automatically or by the AI), case number, court file number with date, country, area of law, stage and description.
Delete. After a confirmation the case is removed completely from IRONSTICK. A full backup of the case is made first; if the backup fails, nothing is deleted.
Sharing and handing over (IRONSTICK SERVER connected only)
Share. Share the case for all users or for selected users that you tick in the list. The case is then uploaded to the server in the background. Once shared, the same button turns red and reads Revoke share, which withdraws the share at once.
Share card. Under the case data a card shows the upload progress and then the subscribers, each with an online dot and the time of last access. Requests from colleagues appear highlighted with Accept and Decline; any subscriber can be removed individually.
Hand over case. Pick the recipient from the list of office users and click Hand over. The case is packed and sent through IRONSTICK SERVER; once the recipient has accepted it, the case is removed from your computer (a backup is kept).
Cases shared with you. A subscribed case can be read but not changed; editing buttons show a notice instead. Under the description you see the owner and the other subscribers. Delete subscription ends the subscription and removes the copy.
The tabs at a glance: client to map
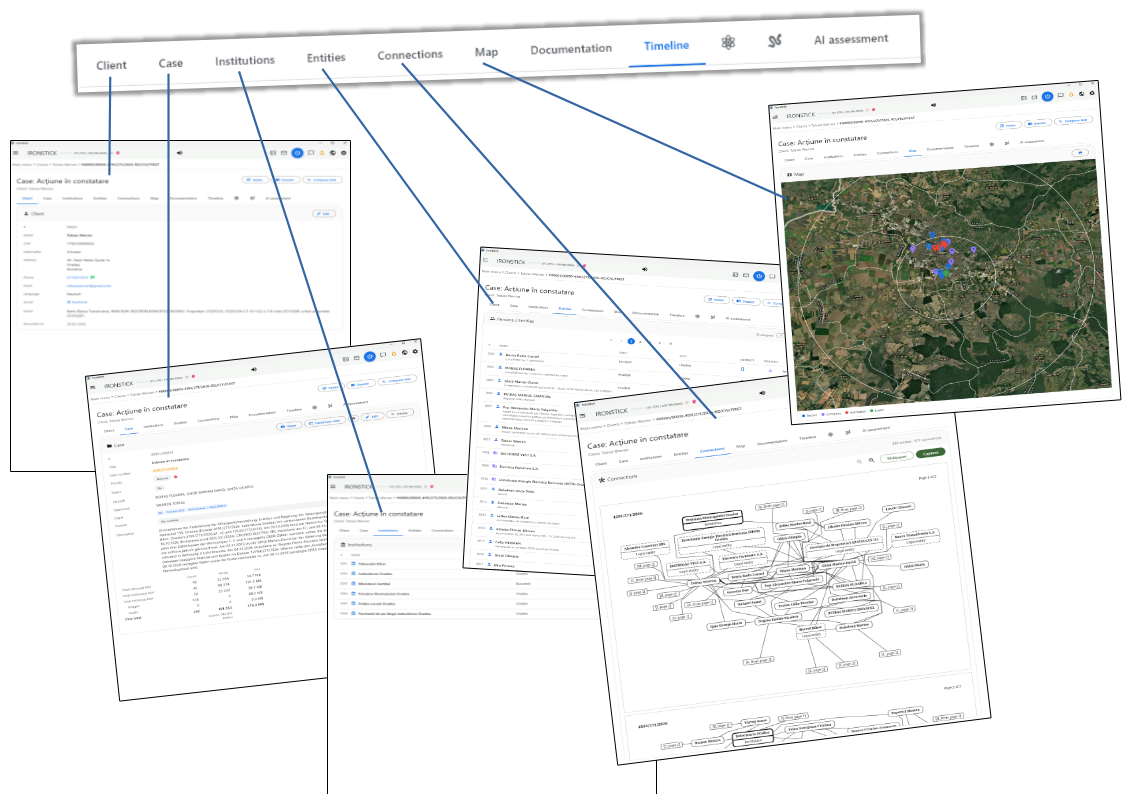
The tabs Client, Case, Institutions, Entities, Connections and Map.
The tab row splits the case into views. The first six tabs show who and what the case is about: the client, the case data, the institutions and persons involved, how they are connected and where things happened.
Each line in the picture points from a tab to the view it opens.
What you can do here
Client
Client card. Number, name, personal identification number, nationality, full address, phone, e-mail, bank and IBAN, language, social media links, details and the date the client was created. Fields that are empty are not shown.
Contact in one click. Click the name for a contact QR code, the phone number for a QR code to call, the green chat symbol for WhatsApp, or the e-mail address to write. Social media links open in the IRONSTICK browser window. Edit opens the client form.
Case
Case data. Client and case number, title, official case number, priority, parties, country, area of law, stage, start date, description and the size of the case, with buttons to print, edit or delete the case.
Institutions and Entities
Who is involved. Institutions lists courts, authorities and other bodies with type, city and contact symbols; Entities lists persons and companies with type, city and contact. The header shows how many are assigned. Long lists are split into pages of 20.
Open an entry. Click a row to open the institution or person list with that entry highlighted. Phone and e-mail symbols open a QR code, the globe opens the website in the IRONSTICK browser window.
Analysis. In Entities, the purple analysis symbol appears when an analysis exists for that person; it opens the person analysis.
Add and remove.Add opens a search over all institutions or persons not yet in this case (by name, city or e-mail). Pick one, check the preview and click Add. The broken-link symbol at the end of a row removes the assignment after a confirmation; the institution or person itself is kept.
Connections
Relationship chart. Shows the persons and institutions of the case and how they are linked, over one or more pages; the header counts entities and connections. Where there are many, the most urgent are shown.
Work with the chart. Zoom in and out with the magnifier buttons. Click a name to open that person or institution. Wallpaper downloads the chart as a large poster PDF; Capture passes it to document capture, where you assign it to a case. Neither export button is available on the Android tablet.
Map
Everything on the map. Persons (blue), companies (purple), institutions (red) and events (green) appear on a satellite map; a legend below explains the colours. White rings mark distances of 5, 15 and 30 km around the centre of the case.
Missing positions. Addresses without coordinates are looked up automatically while the map is open; a small notice shows the progress, and the found position is remembered.
Details and print. Click a marker for name, type and address; its detail link opens the person, the institution, or the chronicle entry (highlighted in the Timeline). The print button exports the map as a PDF.
The tabs at a glance: documentation to AI assessment
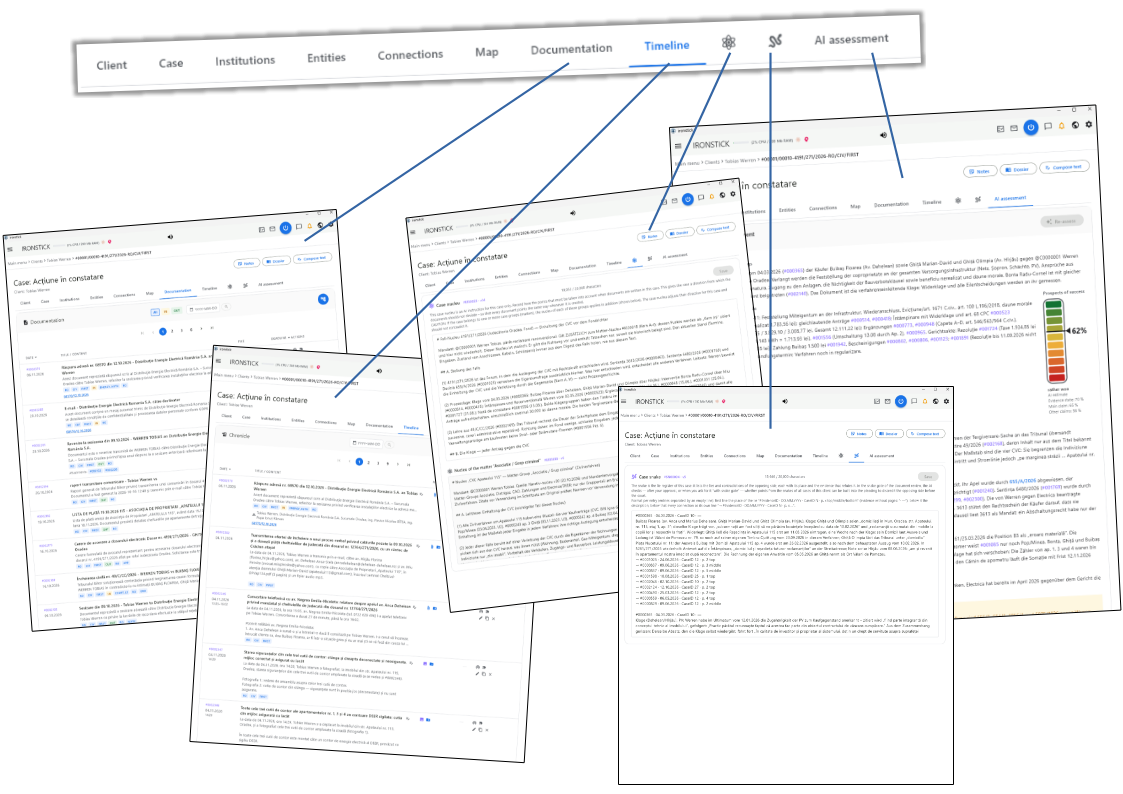
The tabs Documentation, Timeline, case nucleu (atom), case snake and AI assessment.
The remaining tabs hold the content of the case: the filed documents, the timeline of everything that happened, two text areas that guide all written work on the case, and the AI assessment.
The atom and the snake are shown as symbols only; point at them to see their names.
What you can do here
Documentation. All documents of the case with a PDF — incoming, outgoing and evidence — with filters by direction, a jump to a date and the chronology chart.
Timeline. The chronicle of the case: every event, document, photo, call and note in date order.
Case nucleu (atom). The binding direction for all written work on this case — what every pleading must follow. Write or change the text and click Save; each save creates a new version, and the copyable code with its version number shows which one is current. A counter shows the length (up to 20,000 characters). Below, read-only, you see the nucleu of every matter this case belongs to.
Case snake. A register of the opposing side's statements in this case that the case file contradicts, so that they can be used in pleadings. It is edited and saved the same way as the nucleu, with its own version number.
AI assessment. An AI evaluation of the prospects of the case: chances of success, the basis of the proceedings, the court file and the IRONSTICK file, strengths, weaknesses and a critical note.
Timeline
The Timeline tab: the chronicle of the case, newest entries first.
The Timeline lists every entry of the case — events, letters, e-mails, calls, photos, recordings — with the newest first. Each row shows its number and date, title, description and labels, the attached files, a deadline marker and the actions.
The enlarged row at the bottom of the picture shows the parts of a single entry.
Notes. Opens the case pinboard. Your own notes are yellow, notes from subscribers of a shared case are white cards, and notes the AI has remembered for this case appear on squared paper. Click New note to write one (up to 1,000 characters, optionally with a date), click a yellow note to edit it, any note to read it in full; each has small copy and delete buttons.
Dossier. Opens the dossier assistant, which builds a complete dossier of the case. It appears only when the Timeline has entries.
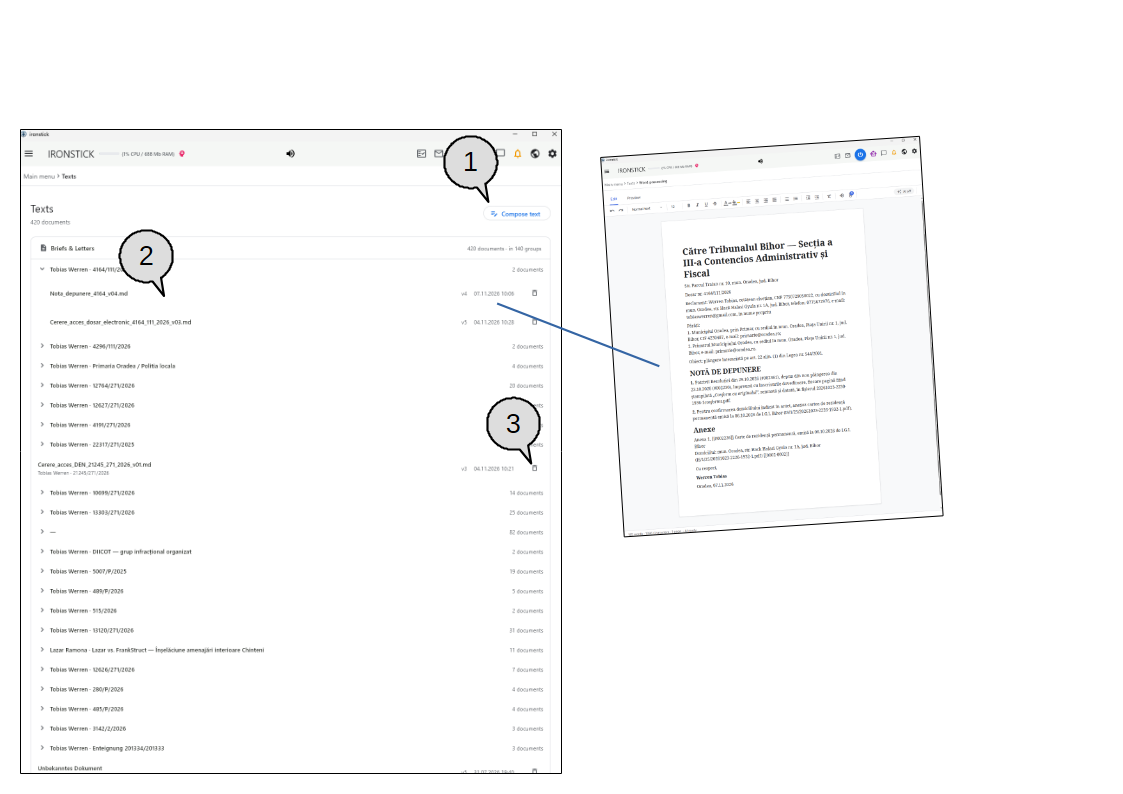
Compose text. Choose With AI help to open the AI chat with a request to draft a document for this case, or Empty text document to start writing in the word processor. Not shown on the Android tablet.
Jump to a date. Pick a date and click the magnifier to go to the page that contains it.
New entry. Opens the form for a new chronicle entry.
Entry number and date. The purple number identifies the entry; click it to copy it to the clipboard. Below it are the date and, if recorded, the time from–to.
Paperclip and folder. The paperclip opens the attached document; for an entry without any file, picture or transcript it exports the entry itself as a PDF. The folder shows how many work folders the entry is filed in — click it to tick or untick folders or to create a new one; an empty folder with a plus means the entry is not in any folder yet. Further symbols appear here for pictures, transcripts, audio or a location.
Actions. Five symbols in two rows:
Symbol
What it does
Radar (first row)
Opens the relevance radar: the entries in this case and in other cases that are most similar in content. Click a hit to jump to it.
Tag (first row)
Attaches tags to the entry — global tags in red, yellow, green or blue, or case tags. The symbol takes the colour of the first tag.
Pencil (second row)
Edits the entry: an entry without a document opens the chronicle entry form, an entry with a PDF opens the document form.
Copy (second row)
Copies the entry, with its documents, pictures and transcripts, into another case of the same client.
× (second row)
Deletes the entry after a confirmation.
For secret documents, tag, pencil and copy are greyed out; only delete remains.
What you can do here
The list
Pages and sorting. The list shows 20 entries per page; page buttons appear above and below the list when there is more than one page. Click the Date column header to switch between newest and oldest first.
What a row tells you. Under the title you see the description, coloured labels (country, area of law, stage, IN in orange or OUT in green, institution type, language, document type) and the persons involved.
Write a text about an entry. The small pencil-and-lines symbol next to the title starts Compose text for this particular entry; a number in front of it counts the texts already written about it. Not shown on the Android tablet.
Deadline column. An orange bell means the entry's deadline is due within 10 days, a red ringing bell that it is overdue. Point at the bell to see the days left or the date.
Coming from search or the radar. When you open the case from a search result or the relevance radar, the Timeline goes to the right page and the entry lights up yellow for a few seconds.
Actions on an entry
Relevance radar. Shows which other entries — in this case and in other cases — are most similar in content. Click a hit to jump to it.
Tags. Attach short tags (up to 100 characters) to the entry: global tags in red, yellow, green or blue, or case tags in teal. Click an existing tag to change it, or its × to remove it. The tag symbol takes the colour of the first tag.
Work folders. Lists the folders of every matter the case belongs to; tick a folder to put the entry in it, or create a New folder. If the case is not in a matter, a notice says so.
Edit. An entry without a document opens the chronicle entry form. An entry with a PDF opens the document form: classification (country, language, area of law, document type, stage, institution type, document date), the entry type (evidence, inbound or outbound), a court-decision tick box and the usual entry fields (title, date, keywords, times, description, persons involved, deadline); buttons there let you view the PDF and read its extracted text.
Copy to another case. Choose a target case of the same client; the entry is copied with its documents, pictures and transcripts. Copy becomes active once a case is selected.
Delete. Removes the entry after a confirmation.
New entry form
Entry details. Title, date, keywords, time from and to, and a description. Either a title or a description is required.
Persons involved. Type part of a name to search the persons and institutions assigned to this case; click a hit to add it as a chip, click its × to remove it.
Deadline. Set a deadline date and tick whether it is active; active deadlines appear in the deadline overview and the bell.
Location. Switch on the geo coordinates, enter an address and click the magnifier to look it up, or click directly on the map; latitude and longitude are filled in for you.
Pictures. Switch on media to add up to four images (JPEG, PNG, WebP): drag them onto the drop area or click it to choose files. Drag a picture onto another slot to change the order; the × removes it.
Save or cancel. The buttons at the bottom save the entry or close the form without saving.
Opening documents, pictures and recordings
An attached PDF opens in its own window; photos open in the picture viewer.
Every file attached to an entry opens straight from the Timeline. In the picture, the paperclip of the first entry has opened its PDF in a separate window, and the picture symbol of another entry has opened its four photos.
The date field at the top helps you find your way in long timelines.
Jump to a date. Appears when the Timeline has more than three pages. Click the field and pick a date — only dates that exist in the case can be chosen — then click the magnifier next to it to go to the page holding that date.
What you can do here
Files of an entry
Documents. The blue paperclip opens the attached document in its own window — in the program your computer uses for PDFs, otherwise in your web browser.
Entry as PDF. For an entry without document, pictures or recording, the paperclip creates a PDF of the entry itself and saves it for you.
Pictures. The purple picture symbol (pointing at it shows how many) opens the picture viewer with all photos of the entry, numbered. Click a photo to see it full screen with zoom; click again or the × to close. Export document saves the photos with the description as a PDF.
Transcripts and chats. A purple symbol opens the transcript of a call or recording, or a chat, with date, time from–to, type and the number of lines; each speaker has a colour. Export document saves it as a PDF.
Audio. The blue note plays the original recording in your computer's media player.
Location. The green pin opens a small map with the place of the entry and a button to show it in Google Maps.
Links between documents
Annexes and where a document was filed. An outgoing letter lists its annexes as blue numbers; an incoming document or piece of evidence shows in which letters it was submitted, grouped by case with the case number behind. Click a number to open that entry, or the case number to open that case.
Reference numbers. If other documents carry the same registration or letter number, that number is shown underlined. Click it to see all documents with that number and open any of them.
Documentation tab
The Documentation tab lists every entry that has a document; the chronology chart shows the correspondence as a flow.
The Documentation tab is the paper side of the case: it lists only the entries that carry a document (letters, pleadings, decisions, scans), newest first, 20 per page.
Each row shows the entry number, date, title, a short summary, the classification tags and the tools for that document.
The blue button on the right of the card opens the chronology — the incoming and outgoing documents drawn as a flow chart from top to bottom, as shown on the right of the picture.
Direction filter.All shows every document, IN (orange) only incoming documents, OUT (green) only documents you sent. The active chip is shown in bold with a frame.
Jump to date. Pick a date in the calendar field and click the magnifier to jump to the page that holds that date. The field only appears when the list is longer than three pages; the calendar only offers dates that exist in the case.
What you can do here
The list
Sort. Click the Date column heading to switch between newest and oldest first. Click Deadline to sort by open deadlines, nearest first (click again to reverse).
Entry number. The purple number above the date is the entry's IRONSTICK number. Click it to copy it to the clipboard.
Tags under the summary. The small chips show country, area of law, stage of proceedings, direction (IN orange, OUT green), type of institution, document language and further classification. Point at area of law or stage to see the full name.
Annexes and "submitted in". For a document you sent, Annexes lists the entries enclosed with it. For an incoming document or a piece of evidence, Submitted in lists where it was filed, grouped by case with the case number behind each group. Click a number to open that entry in the timeline, or the case number to open that case — even if it belongs to another case.
Reference numbers. Blue underlined numbers are letter or registration numbers that also appear in other documents. Click one to see all documents with the same number and open any of them.
Deadline. A bell appears when the entry carries an open deadline: orange when it is due within 10 days, red when it is overdue. Point at it to see the days left or the overdue date.
Tools in each row
Compose text. The note icon next to the title opens a choice: write a letter with the help of the AI (the chat opens with this case and this document already referred to) or open an empty text document in the word processor. A number in front of the icon shows how many texts already exist for this entry. Not available on the Android tablet.
Open the document. The paperclip opens the document in the IRONSTICK browser window; point at it to see the file name. A green pin appears when the entry has a location — click it to see the place on a map.
Work folders. The folder icon files the document into the work folders of the matters this case belongs to: tick or untick a folder, or create a new folder. When the entry is already filed, the icon shows a filled folder and its tooltip the number of folders.
Relevance radar. The radar icon finds the entries that are most similar in content, in this case and in other cases. Click a hit to jump to it in the timeline.
Tags. The label icon attaches your own tags to the document — general coloured tags or tags that apply only to this case. Once tagged, the icon takes the colour of the first tag.
Edit. The pencil opens the document entry for editing (title, date, classification, deadline and so on).
Copy to another case. The copy icon copies the entry together with its document into another case of the same client. Choose the target case, then click Copy.
Delete. The cross deletes the entry after you confirm it.
Chronology chart
Read the course of the case. The chart shows all incoming and outgoing PDF documents in date order, linked by arrows. Documents you sent have a black heading, documents with an open deadline a thick frame. The annexes of an outgoing letter appear as separate boxes beside it.
Open an entry. Click the underlined entry number in a box to go straight to that entry.
Zoom and scroll. Use the two magnifier buttons to zoom in and out; long chronologies run over several pages that you scroll through.
Capture as a document.Capture turns the chart into a PDF and opens the document capture, where you assign it to the case and save it like any other document. Not available on the Android tablet, where the chart can only be viewed. Close the chart with the X.
Dossier: choosing entries and pages
First step of the dossier: decide which entries and which pages go into it.
The Dossier button at the top of the case (shown only when the case has timeline entries) opens an assistant that builds one complete, paginated file of the case — as a PDF or as an EDRM production package.
In the first step, Prepare dossier, you go through all timeline entries and decide what goes in. The picture shows an excluded entry (red sign), a partly excluded document (yellow circle), the page selection of a document and the picture preview of a photo entry.
What you can do here
Leave out an entry. Click anywhere on a row to exclude the entry: it turns pale and a red sign appears in the middle. Click again to take it back in.
Leave out single pages. The blue round button of a document opens Select pages with a preview of every page. Click a page to exclude it (red sign) or include it again. When some pages are excluded, the button turns yellow and the row is dimmed with a yellow circle in the middle; click the circle to change the page selection.
Look before you decide. The paperclip opens the document in the IRONSTICK browser window. The picture icon shows the photos of the entry (up to four), the microphone or chat icon the transcript or chat. These previews do not change anything.
Find an entry. Type at least two characters in the search field; matching entries appear in a list. Click one to jump to it — the right page opens and the entry lights up. You can also enter an IRONSTICK document stamp; if that document belongs to another case, the dossier preparation of that case opens at the document.
Sort. Click the Date heading to switch between newest and oldest first. The header shows the case title, case number and number of entries.
Continue or cancel.Continue to dossier data takes you to the next step; Cancel goes back to the case. Your choices for this case are kept while the program stays open, so you can go back and forth between the steps.
Dossier: data, print preview and export
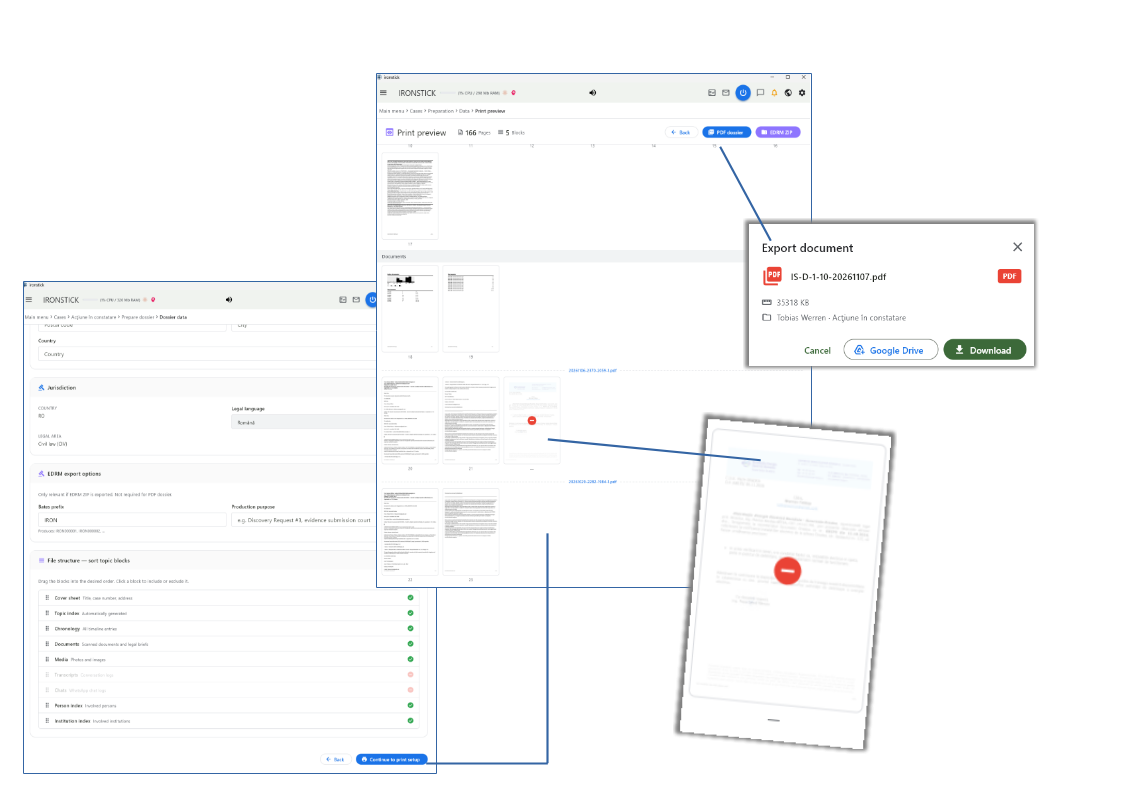
Set the cover sheet and structure, check every page, then export the dossier as PDF or EDRM ZIP.
In the second step, Dossier data (left), you fill in the cover sheet, check the jurisdiction and decide which topic blocks the dossier contains and in which order.
Continue to print setup opens the Print preview (middle), which shows every single page of the finished dossier. From there you export it as a PDF dossier or as an EDRM ZIP; the export dialog (top right) saves the file.
What you can do here
Dossier data
Cover sheet address. Choose one of the case's institutions from the list to fill in the recipient automatically, or type name, address, postcode, city and country yourself.
Jurisdiction. Country and area of law are taken from the case. If the country has more than one legal language, choose the language in which the dossier's own pages are written.
EDRM export options. Only needed for the EDRM ZIP, not for the PDF dossier. Enter a Bates prefix — the line below shows the resulting numbers — and, if you like, the production purpose (for example a discovery request or an evidence submission).
Topic blocks. The dossier is built from blocks: cover sheet, topic index, chronology, documents, media, transcripts, chats, person index and institution index. Drag a block by its handle to change the order; click a block to include it (green tick) or leave it out (red sign). Blocks for which the case has no content are left out automatically.
Back or continue.Back returns to the entry selection; Continue to print setup builds the preview.
Print preview
Watch it being built. A progress bar shows how far the preview is. Building continues in the background even if you leave the screen.
Check every page. All pages appear as numbered thumbnails, grouped by block. Each document starts with a dashed line showing its file name. The header counts the pages and blocks of the dossier.
Remove pages. Click a page of a document to remove it from the dossier (red sign, no page number) and click again to restore it. Empty pages in documents are detected and removed automatically. Pages that IRONSTICK generates itself, such as the cover sheet or the indexes, cannot be removed here. The topic index is updated with the real page numbers.
PDF dossier. Creates the finished, paginated dossier. When it is ready, the export dialog opens by itself; Back to preview returns to the pages.
EDRM ZIP. Creates an electronic production package with Bates numbers, the native documents, their text and the usual load files. Afterwards you see the number of documents, the total pages and the Bates range, and Download EDRM ZIP saves the package.
Export dialog
Save the file. The dialog shows the file name, size and case. Download saves the file in your Documents folder and shows it. Google Drive appears only when a Google Drive folder is synchronised on this computer and lets you save the file into one of its folders. Cancel or the X closes the dialog.
AI assessment tab
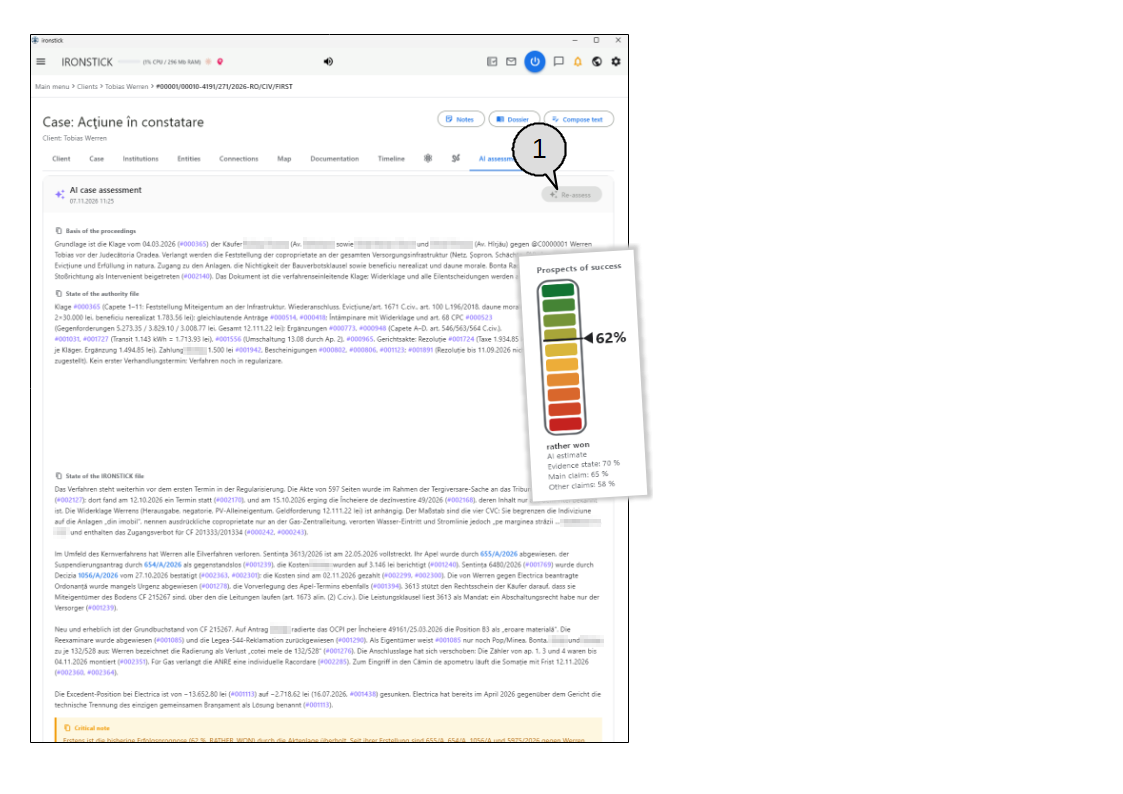
The AI assessment of the case with the prospects-of-success gauge.
The AI assessment tab gives a written evaluation of the case by the AI. The descriptive sections draw on your whole case file; the prospects of success are judged only on what the court has on its file. It shows the basis of the proceedings, the state of the court file (the file held by the court or authority) with an estimate of the prospects of success, the state of the complete IRONSTICK file, critical notes, strengths and risks, and links to related cases.
Every entry number, case reference and case number in the text is a link. The date under the title shows when the assessment was made.
Re-assess. Starts a new assessment. Without an assessment the button reads Request assessment. It is greyed out, as in the picture, when no new documents have arrived since the last assessment (unless you write a comment below) or when the case is not active.
What you can do here
Starting an assessment
Request or renew. Click Request assessment or Re-assess. Before anything is sent, IRONSTICK asks whether the external AI may be used; nothing leaves your computer until you confirm.
Update instead of starting over. Shortly after a full assessment (within one day, and at most three times in a row), the button becomes a menu with Update and Re-assess. Update only adds the documents that came in since and rewrites the sections that change, which is much faster.
Active cases only. Inactive or paused cases are not assessed. The buttons are locked and a notice asks you to set the case to active first.
Follow the progress. While it runs, the card shows the current phase — preparing, reading text from documents that have none yet (done locally), searching the files, writing the assessment, estimating the prospects — and a live log of each step.
Keep working. The assessment runs in the background. You can switch tabs, open other cases or start assessments for several cases at once; a notice tells you when one is finished.
Reading the assessment
Basis of the proceedings. Who claims what against whom, before which court or authority.
State of the court file and prospects of success. Describes only what the court or authority has on its file — everything sent to it or received from it by both sides. The gauge beside it shows the AI's estimate in percent, the verdict (from clearly lost to clearly won) and, where available, the separate figures for the state of the evidence, the main claim and the other claims. If no court file can be identified, this section is missing and the gauge stays empty ("not estimable").
State of the IRONSTICK file. The picture from your complete file, including documents the court has not seen.
Critical note, strengths and risks. An orange box flags the most important danger. The green box lists the strengths of your position, the red box risks and open points.
Related cases.Cross-case links show how other cases of the same client affect this one (from, to, effect — marked as prejudicial, evidence or strategic). A yellow box lists cases of other clients with the same opponent or participants, and explains how to bring one of them into the assessment through the comment field.
Copy a section. The small copy icon in front of a heading copies the heading and its text to the clipboard.
Follow the links. A purple entry number opens that entry in the timeline. A blue case reference or case number opens that case, if it exists in IRONSTICK.
Warnings and extra reading. A yellow notice at the top warns when the assessment may be incomplete (research limit reached or a technical error during research). Reloaded full texts lists the documents the AI read in full; click one to open it.
Objections and additions
Correct or add to the assessment. Write your objections, missing facts or instructions in the field at the bottom. As soon as you have written at least three words, Re-assess becomes available and the AI assesses the case again, taking your comment into account.
How the AI assessment is made
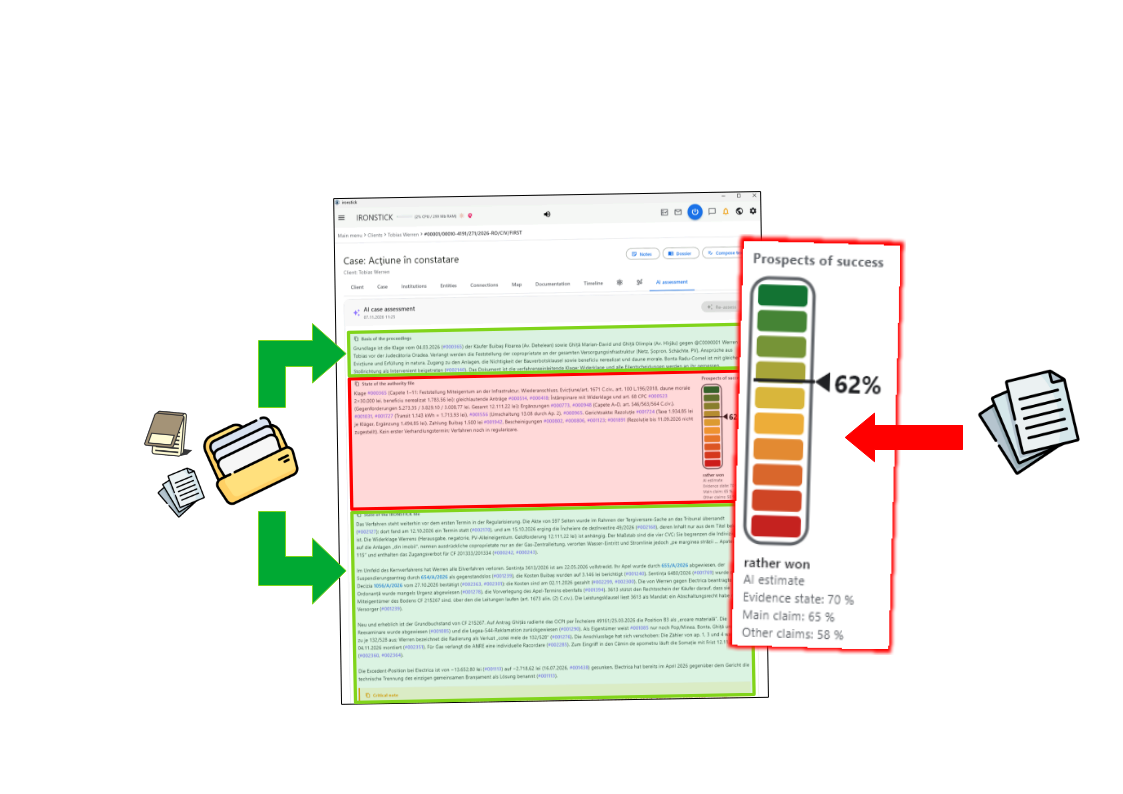
Green: drawn from the whole case file. Red: only the part of the file that the court has.
The assessment works with two different sources, marked in the picture.
The green sections are written from the whole file in IRONSTICK — every document, entry, e-mail and transcript of the case — and from the neighbouring cases of the same client.
The red section with the gauge judges only the part of the file that lies before the court: what you submitted to it and what it or the other side sent to you. Documents the court has never seen do not count towards the prospects of success.
What you can do here
The green sections — your whole file
Basis of the proceedings. Who claims what against whom, before which court or authority, as it follows from the whole file.
State of the IRONSTICK file. The complete picture of the case as it stands in IRONSTICK, including your own notes, evidence and correspondence that the court does not know about, and the effects of the client's other cases.
Critical note, strengths and risks. Also written from the whole file and the neighbouring cases.
The red section — only the court file
State of the court file. Describes only what the court has on its file — every submission and every document received from the court or the other side in these proceedings.
Prospects of success. The gauge runs from red (lost) at the bottom to green (won) at the top; the arrow and the percentage show the AI's estimate, and the verdict below it (for example rather won) puts it into words. Where available, separate figures follow for the state of the evidence, the main claim and the other claims.
Why only the court file. The court decides on what it has in front of it. A strong document in your file that was never submitted does not improve the estimate until it reaches the court — the green sections show you such gaps.
No court file, no estimate. If IRONSTICK cannot identify the court or the documents before it, the red section is missing and the gauge stays empty.
6. Persons / Entities
Person list, details and relationship network
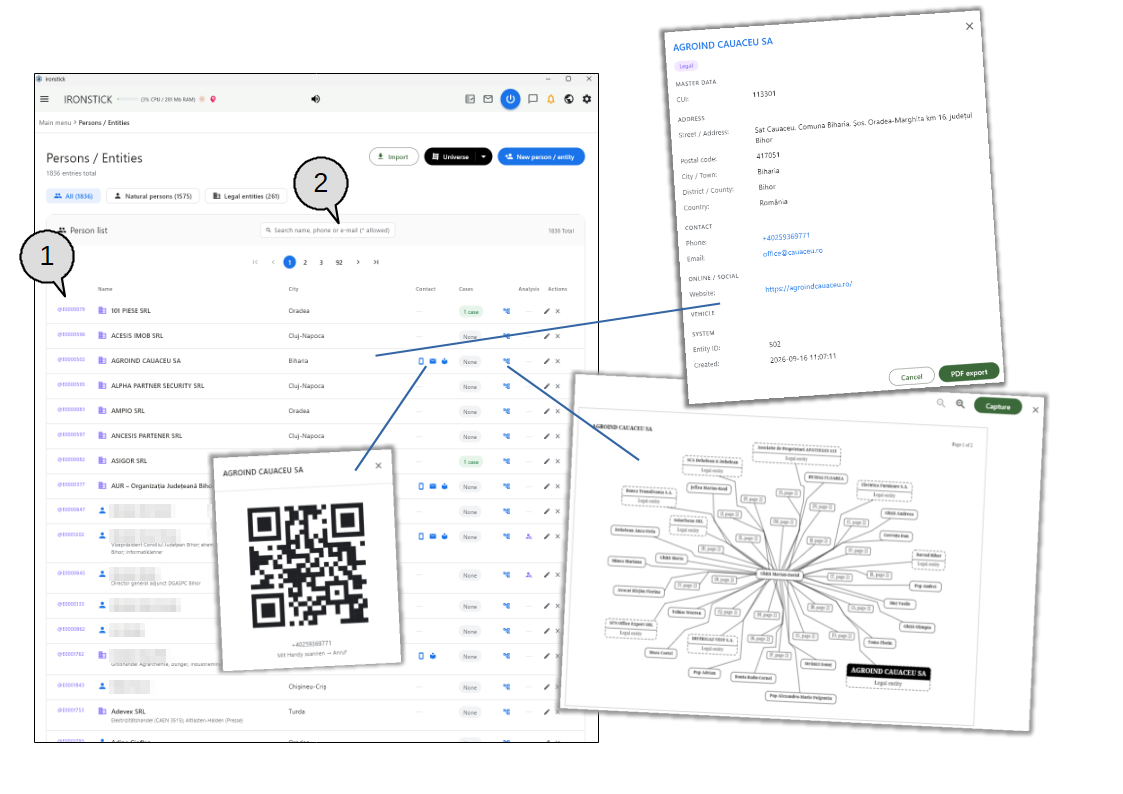
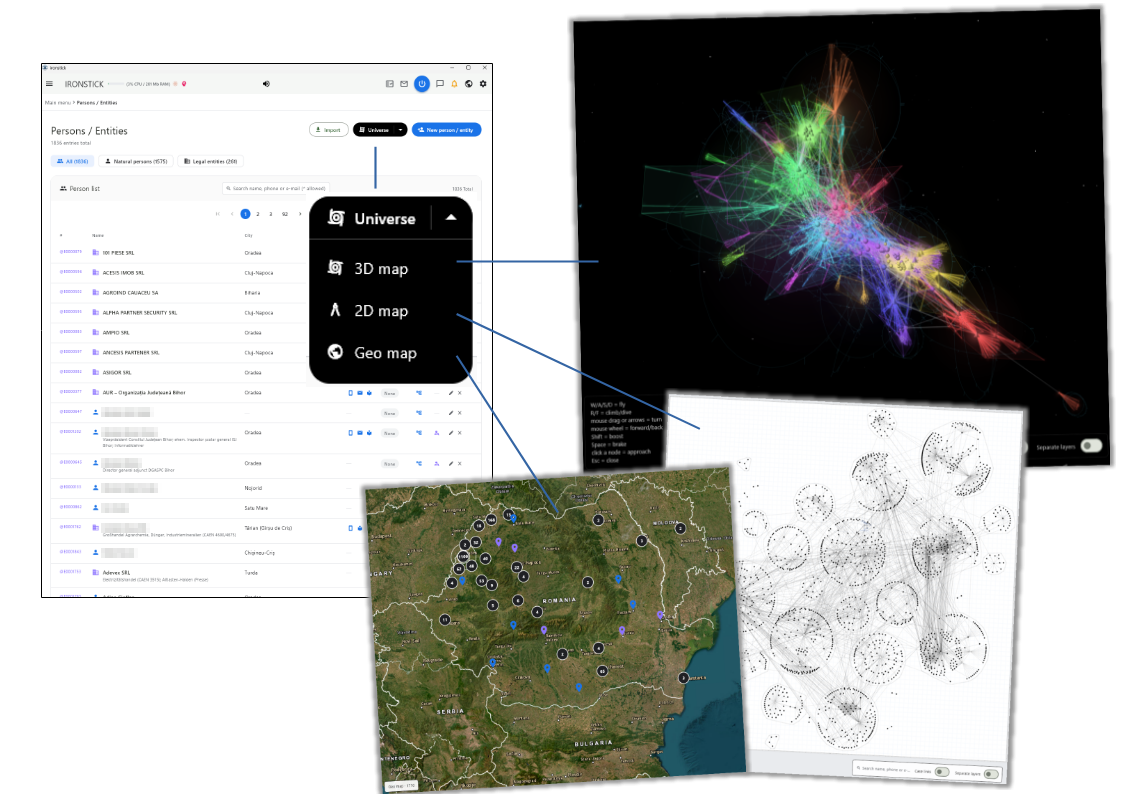
The person list with the detail window, a phone QR code and the relationship network of a company.
This screen holds every natural person and every legal entity (company, association, authority as a party) that appears in your cases.
The picture shows the list with its filter buttons and search field, the detail window of a company, the QR code that opens when you click a phone icon,
and the relationship network that opens from the network icon of a row.
Reference number. Every person or company has its own reference in the form @E0000279. Click it to copy it to the clipboard, for example to quote the person in a chronicle entry, a note or a chat with the AI.
Search field. Narrows the list as you type: by name, phone number, e-mail address or city. Several words must all match; * works as a wildcard, and names that only sound alike are found too.
What you can do here
Page header
Number of entries. Under the title you see how many entries are shown; when a filter is active, this is noted next to the number.
Import. Opens a window into which you drag a data package file received from another IRONSTICK user (persons, companies, institutions, their relationships and person analyses). A progress bar runs during the import; afterwards you see how many entries were new, how many were already known and how many relationships were added. If the package brings extra details for persons you already have, these appear as suggestions in the Data Consistency Monitor instead of overwriting your data. A damaged or wrong file is rejected with a message.
Universe. The black button opens the three visual maps of all your parties: 3D map, 2D map and geo map.
New person / entity. Opens the entry form for a new person or company.
Filter and list
All / Natural persons / Legal entities. The three buttons above the list show the number in each group. Click one to see only natural persons or only legal entities; the list returns to page 1.
Pages. The list shows 20 entries per page. When there is more than one page, the page navigation appears above and below the list.
Columns. Each row shows the reference number, a blue person icon or a purple company icon, the name (for persons also the profession), the city, contact icons, the number of cases the entry is involved in (green) or None (grey), the network icon, the analysis icon and the actions.
Contact icons. The phone icon and the e-mail icon each open a QR code: scan it with your phone to call or to write an e-mail at once. A click on the QR code itself opens the matching program on this computer; if there is none, the number or address is copied to the clipboard. A book icon shows that social-media profiles or a website are stored.
Network icon. Opens the relationship network of this person or company.
Analysis icon. The purple icon appears only for natural persons who already have a person analysis. Click it to open the analysis.
Edit and delete. The pencil opens the entry form. The cross deletes the entry after a confirmation; if the entry is still linked to cases, relationships or a person analysis, the confirmation lists these links in a yellow warning. Deleting a person also removes all of that person's relationships.
Coming back from other screens. When you jump here from the search, a case or one of the maps, the entry is found on the right page and lights up yellow for a few seconds.
Detail window
Open the details. Click anywhere on a row. The window shows a tag Natural person or Legal entity and all filled fields, grouped into master data, address, contact, online / social, profession (persons only), vehicle and system data (entry number and creation date). Empty fields are left out.
Contact card as QR code. Click the name in the title, the street or the city: a QR code with the complete contact card appears, which you can scan straight into your phone's address book.
Phone, e-mail and web links. The blue phone number and e-mail address open their QR codes. Facebook, LinkedIn, Instagram and website links open in the IRONSTICK browser window.
PDF export. Creates a person sheet as a PDF: master data, case involvements, person analysis and relationships, only with the fields that are filled. You can then save it to your Documents folder or to your Google Drive folder.
Relationship network
Who is connected to whom. The network shows the person or company in the centre with its direct relationships and the relationships of those contacts (two levels), as a chart on one or more pages.
Move through the network. Click another person, company or institution in the chart: the window rebuilds itself around that party. Page references in the chart jump to the matching page; the magnifier buttons zoom in and out.
Capture. Turns the chart into a PDF and opens it directly in Capture document, so that you can file it in a case with the usual stamp. This button is not available on the Android tablet.
Entering or editing a person
Kind of entry. Choose Natural person or Legal entity first; the form adapts. Only the name is required. For persons you also have personal ID number, date of birth (date picker), nationality and religion; for companies the company registration number instead.
Address and position on the map. Enter street, postcode, city, district and country (for a new entry the country is preset from your configuration). Switch on the geo coordinates to search the address on the map, type latitude and longitude, or simply click the right spot on the map.
Contact, online, profession, vehicle. Phone, fax, e-mail (checked for a valid format), contact details, description, social-media links and website, profession and employer (persons only), car and number plate.
AI autofill and Google search. For a legal entity with a name and a country, a button appears in the header. If an AI key is configured, AI autofill asks for your consent and then lets the external AI look up the company on the internet; it fills only empty fields and marks them with a purple frame. Afterwards, or without an AI key, the button becomes Google search, which opens the search in the IRONSTICK browser window.
Save or cancel. The save button stores the entry and returns to the list. When you edit an existing natural person, a Person analysis button also appears at the bottom left.
Entries of other users on IRONSTICK SERVER. If an entry belongs to another user of the server, a banner says so. Saving then sends your changes as a change proposal to the owner, and deleting sends a deletion proposal instead of deleting.
Person analysis and web research (natural persons only)
Person analysis. A structured profile of a person: role in the case (for example opponent, witness, third party), reliability (unconfirmed, partly confirmed, confirmed — shown as a coloured tag) and date of the analysis; identity and location with up to three residences, each with its own map position; background (family, taxes, debts, business, online presence, social environment); and an assessment (role in the network, vulnerabilities, overall strategic assessment, sources). The footer shows when it was last saved. Companies have no person analysis.
Relationships. At the bottom of the analysis you add relationships: search a person or institution, choose a category (family, work, religion, location, crime, finances, social, politics, education, military/police, digital/online) and add a short description such as "is the wife of". Existing relationships can be edited or deleted; they feed the network and the maps.
Web research. The Web research button in the analysis searches the internet for the person and lists the hits. Remove unwanted hits, then let the remaining pages be loaded and summarised, tick the sources you trust and click Analyse selected. The result appears as an editable preview of the analysis fields, which you save into the person analysis. The external AI is used only after you agree; every link can be opened in the IRONSTICK browser window.
Universe: 3D map, 2D map and geo map
The Universe button opens three views of all your parties.
The Universe button in the header of the person list opens three different pictures of everyone in your files and how they are connected.
The 3D map is a space you can fly through, the 2D map lays the same network out like a technical drawing on squared paper,
and the geo map places all persons and companies with a known location on a satellite map. Each view opens full screen and closes with the X or Escape.
What you can do here
3D map
The universe builds itself. A progress bar shows how far the picture is; groups of closely connected parties (cliques) appear one after another, each in its own colour. Groups with conspicuous connection patterns are highlighted in flashing red. The line at the top left counts parties, links and cliques.
Fly. W/A/S/D fly forward, left, back and right; R and F climb and dive; drag the mouse or use the arrow keys to turn; the mouse wheel moves forward or back; Shift moves faster, Space slows down. The panel at the bottom left lists these keys, and a small bar at the bottom right shows your speed.
Find and approach a party. Click a point to mark it and fly to it automatically; click it again to remove the mark. The search field at the bottom right finds the best-matching name and flies there too.
Back to the list. Double-click a point: the map closes and the person lights up yellow in the person list. An institution opens the institutions list instead, highlighted the same way.
Case links and separate layers.Case links also connects parties that appear in the same case. Separate layers places institutions at the top, persons in the middle and companies at the bottom. Both switches rebuild the picture and are remembered.
Flight through the 3D map of all parties.
The cliques — groups of closely connected parties — are calculated automatically by deterministic community detection (no AI). The calculation always covers all persons, companies and institutions in IRONSTICK, without any action on your part. The more qualified connections a party has, the larger its sphere is drawn.
2D map
Move like on a sheet of paper. Drag with the mouse or use W/A/S/D to move the sheet; the mouse wheel zooms towards the pointer.
Look at a party. Point at a node to see its links and name tags. A click marks it (it pulses), a click on the empty sheet removes the mark, and a double-click returns to the list with the entry highlighted.
Search and switches. The search field at the bottom right finds a party by name; Case links connects parties from the same case; Separate layers stacks institutions, persons and companies.
Geo map
Everyone with an address on the map. Persons appear blue, companies purple. Only entries with known coordinates are shown; IRONSTICK fills these from the addresses in the background. The label at the bottom left shows how many markers there are.
Bundled markers. Parties that are very close together are combined into one numbered marker. Click it to zoom in or, if they are at the same place, to list them.
Details. Click a marker to see name, type and address; Details closes the map and highlights the entry in the person list.
7. Institutions
The institutions list with the detail window of an authority and its phone QR code.
Institutions are courts, authorities, public agencies and similar bodies that you deal with in your cases.
The list shows each institution with its classification tags, city, contact icons and the number of cases it is involved in.
The picture also shows the detail window of an authority and the QR code that opens when you click its phone icon.
Reference number. Every institution has its own reference in the form @I0000030. Click it to copy it to the clipboard, for example to quote the institution in an entry or a chat with the AI.
Search field. Narrows the list as you type: by name, phone number, e-mail address or city. Several words must all match, * works as a wildcard, and names that only sound alike are found too.
What you can do here
List
Overview. The title shows the total number of institutions, the card header the number currently listed. The list shows 20 entries per page; with more than one page, the page navigation appears above and below the list.
Classification at a glance. Under each name, small grey tags show the country code, the type code and the region, followed by the type name.
Contact icons. The phone and e-mail icons open a QR code to call or write with your phone; a click on the QR code opens the matching program on this computer (or copies the value if there is none). The globe icon opens the website in the IRONSTICK browser window.
Cases. A green tag shows in how many cases the institution is involved; None means it is not linked to any case yet.
Edit and delete. The pencil opens the entry form. The cross deletes the institution after a confirmation; if it is still linked to cases or relationships, a yellow warning lists them. Deleting also removes the institution's relationships.
Coming from other screens. When you arrive from the universe maps or another screen, the institution is found on the right page and lights up yellow for a few seconds.
Detail window
Open the details. Click a row. The window shows classification (type, type code, region), address, contact and system data (institution number and creation date); empty fields are left out.
Contact card as QR code. Click the name in the title or any part of the address to get a QR code with the full contact card for your phone.
Phone, e-mail, website. Phone and e-mail open their QR codes; the website opens in the IRONSTICK browser window. Close closes the window.
New or edit institution
New institution. The blue button at the top right opens the entry form; the pencil in a row opens the same form for an existing institution.
Classification. The name is required. Choose the institution type and the region from the lists.
Address and map position. Street, postcode, city, district and country. Switch on the geo coordinates to search the address on the map, type latitude and longitude, or click the spot on the map.
Contact. Phone, fax, e-mail and website.
AI autofill and Google search. Once a name and a country are entered, a button appears in the header. With an AI key configured, AI autofill asks for your consent and lets the external AI look up the institution on the internet; it fills only empty fields and marks them with a purple frame. Afterwards, or without a key, the button opens a Google search in the IRONSTICK browser window.
Institutions of other users on IRONSTICK SERVER. If the institution belongs to another user of the server, saving sends a change proposal and deleting sends a deletion proposal to the owner.
8. Capture documents
Document inbox and capture form
The document inbox, the page selection and the capture form with its text view.
Every PDF that is to go into a case passes through this inbox. On the left you see the inbox with its drop area and the list of waiting files;
on the right the Capture document form, where the document is assigned to a case and described. In front of it is the page selection window,
which opens first for documents with several pages, and the text view that shows what IRONSTICK has read from the file.
Drop area. Drag PDF or Markdown files here, or click to choose them. Markdown files are converted to PDF automatically; other file types are refused with a message.
Inbox indicator. As long as unprocessed documents are waiting in the inbox, a red, animated inbox icon appears in the menu bar; pointing at it shows how many. Click it to come straight to this screen. It disappears when the inbox is empty.
View. Opens the PDF with the program set up for PDFs on this computer.
Capture. Starts capturing this file: page selection, reading the text, AI classification and then the capture form.
Delete. Deletes the file from the inbox after a confirmation. This cannot be undone.
View (in the form). Opens the document you are capturing in the IRONSTICK browser window, so that you can read it while filling in the form.
Text view. Shows the text read from the PDF in a window, where you can select and copy it.
Secret. Marks the document as secret. Secret documents are hidden everywhere in IRONSTICK until you press Ctrl + Shift + S + D (Windows only); the same combination hides them again. Secret mode is never remembered: it switches itself off when the program restarts and on screen saver, standby or screen lock. While it is on, the configuration shows the card where the password for secret documents is set once — it can no longer be changed as soon as a secret document exists. A ticked document is stored as a password-protected PDF (AES-256) and cannot have a deadline.
Secret documents stay inside IRONSTICK: every AI function, built-in or external, filters them out; they are excluded from generated PDFs and annexes; the IRONSTICK browser window cannot open them; and a case hand-over to a colleague includes them only after your explicit confirmation.
Emergency erase:Ctrl + Shift + S + D + K ends secret mode immediately and permanently deletes all secret documents (files and entries). This cannot be undone.
What you can do here
Inbox
Inbox folder. The card lists every PDF in the inbox folder with its size, 20 per page. On Windows the exact folder path is shown next to the title, with buttons to copy it and to open it in Explorer — useful if your scanner saves directly to this folder.
Other ways in. Documents also arrive here from the E-mail Monitor and from charts that you send to capture (for example a relationship network).
After capturing. Once a document has been saved to a case, it disappears from the inbox.
Page selection
Main document and annexes. For a PDF with two or more pages, the window Select pages shows a preview of every page. Enter up to which page the main document runs; these pages are marked blue and always kept. The line next to it tells you on which pages the annexes follow, or that there are none.
Include or leave out pages. Click any further page to switch it between kept (blue frame) and left out (red frame, crossed out). Only the kept pages are read and stored with searchable text — useful for long annexes you do not need in full. Apply starts the reading.
Reading and AI classification
Text is read locally. A progress screen shows each step. IRONSTICK reads the text layer of each kept page; only pages without usable text (scans) go through text recognition.
Parties and case found automatically. Persons and institutions you already have are recognised in the text and suggested as involved parties. A file number in the header, a known letter number or a reference to one of your sent e-mails suggests the matching case. Your own word-processing documents are recognised by their stamp.
AI classification with your consent. Before any text goes to the external AI, you are asked once per program start. The AI then suggests title, date, description, keywords, document type, direction and more. If you decline, the form stays empty for this document and you fill it in yourself.
Fixed facts win. For documents from the E-mail Monitor the direction comes from the mail folder (inbox or sent); for court-mail imports the delivery receipt sets case, date and direction. The AI does not override these.
Assign case & classification
Client and case. Search the client by name, phone or e-mail; after you pick one, the case list shows only that client's cases, active ones first. Choosing a case takes over its country, legal area and procedure stage.
Country first. Legal area and procedure stage can only be chosen after the country, because they come from that country's list. Document language, document type and institution type complete the classification; document type and institution are searched as you type.
Document details
Evidence, Inbound or Outbound. Choose what kind of entry this is. Court decision is ticked automatically when IRONSTICK recognises a court decision; you can change it at any time.
Dates and title. Effective document date, title (required, up to 120 characters), date of the entry (required), keywords and an optional time from / to.
Word processing assignment. Links the document to one of your own word-processing texts — for example the signed version of a letter you wrote. Texts of the same case are listed first; inbound documents are never linked.
Description and involved parties. The description can be edited freely. Involved parties appear as chips: remove one with its cross, add one by searching. If a name is unknown, a button lets you create a new person, company or institution on the spot. Parties that are known to IRONSTICK are linked to the case when you save.
Deadline. Enter a deadline date and tick the box next to it to make it an active deadline.
Saving
Save. Title and case are required; otherwise a red notice tells you what is missing. Saving can take a while for long documents; during that time the menu bar is locked so that nothing is interrupted.
What happens on saving. The PDF receives the IRONSTICK stamp, gets a searchable text layer on the kept pages, is filed encrypted in the case and removed from the inbox. A short summary and cross-references to other entries are added a few seconds later in the background.
Cancel. Leaves the form; the file stays in the inbox.
How a document travels through capture
From the PDF in the inbox to the encrypted entry in the case.
The diagram shows the path of a document from left to right. The PDF is first processed on your computer (page selection and text reading),
then only the text goes to the external AI over the internet for classification, and the result comes back into the capture form.
After you save, the document is encrypted with AES-256 and stored as an entry in the database together with the stamped PDF.
What you can do here
Step 1 — on your computer. You choose the pages; IRONSTICK reads their text and recognises known parties and the case without any internet connection.
Step 2 — external AI, only with consent. The extracted text is sent to the external AI to suggest the classification. Nothing is sent before you agree, and you can always fill in the form yourself.
Step 3 — your check. You review and correct every suggestion in the capture form; only what you save is stored.
Step 4 — encrypted storage. The stamped PDF and its data are stored AES-256-encrypted in the case.
9. Global search
Search results across all cases, with one row shown enlarged.
The global search looks through all entries of all your cases at once: titles, keywords, summaries, descriptions, involved parties,
document contents and the full text of documents, chats and transcripts. The picture shows the results for the word contract;
one result row is enlarged so that its parts are easy to see.
Search field. Type one or more words and press Enter or click Search. With several words, every word must occur in the entry. Accents are ignored, and minor OCR errors in scanned text are tolerated.
Date. The date of the entry.
Direction.IN (blue) marks an inbound document, OUT (red) an outbound one. Evidence entries have no tag.
Exact phrase. The green star appears after the title when your words were found together in exactly this order — usually the most relevant hits.
Case. The case number and, below it, the client the entry belongs to.
Where it was found. The coloured tag shows the field in which the best match was found, for example title, keywords, summary, description, involved parties, document content, full text or letter number. Similarity ~N % means the entry was found because it is similar in meaning, not by the exact word.
What you can do here
Searching
Best hits first. Results are sorted by relevance — a match in the title counts more than one in the full text — and then by date, newest first. The card header shows how many results were found for your search.
Similar entries. For a single word of four letters or more, entries with a similar title or description are added even if the exact word does not appear.
Jump straight to an entry. Type an entry number such as #1234 or just the number, or paste the file name / identifier from an IRONSTICK stamp: the search shows exactly that entry.
Nothing found. A notice tells you that there are no results for your search; try fewer or different words.
Results
Pages. 20 results per page; with more than one page, the page navigation appears above and below the list.
Open a result. Click a row: the case opens on its Timeline tab and the entry lights up so that you see it at once.
Empty title. An entry without a title is shown as "Entry #" followed by its number.
10. Calendar
Two months at a glance, the appointments of the selected day and the calendar export.
The calendar holds your court appointments, witness examinations, meetings, phone calls and tasks.
Two months are shown side by side; coloured numbers and dots show on which days something is planned.
Below the months you see everything planned for the selected day. The picture also shows the export dialog that opens when you export the calendar as an .ics file.
Select a day. Click any day to show its appointments below. The selected day turns blue; today has a grey circle.
Day panel. Shows the selected date, the number of appointments and the button New entry. Below it the appointments of that day are listed, followed by court hearings from a national court portal.
Export .ics. Saves your appointments and court hearings from today onwards as a calendar file that other calendar programs can import.
What you can do here
Moving through the calendar
Browse months. The arrows move the two-month view back or forward; Today jumps back to the current month and selects today.
Read the colours. A day with entries shows its number in colour and one small dot per type: orange for a court-portal hearing or a witness examination, red for a court appointment, blue for a meeting, green for a phone call, grey for other entries and purple for a task. The number takes the colour of the most important entry.
The appointments of a day
Day list. Each appointment shows its time, title, place, the start of the description, the case and client, and a coloured type label. If a day has many entries, the list is split into pages with page buttons above and below.
Open the details. Click an appointment to see date, time, type, place, the full description and the case. Under Prepared documents you find the chronicle entries you attached to the appointment: the purple number opens the case's Timeline with that entry highlighted, the paperclip opens the document itself.
Appointment as PDF. The print button in the details window creates a PDF with a cover sheet for the appointment followed by all prepared documents, with continuous page numbering.
Edit or delete. The pencil opens the appointment for editing; the red bin deletes it after a confirmation.
Tasks. Clicking an entry of the type Task (for example a pleading noted down earlier) opens the AI chat for that case with a request to draft the pleading.
Empty day. If nothing is planned, the panel says so and you can create an entry right away.
Court hearings from a national court portal
Hearings section. Where the court-portal functions for your country are switched on, hearings that IRONSTICK has picked up for your cases appear in their own orange section below the appointments.
Open the case or the portal file. The underlined file number and the Case link open the case's Timeline. A click elsewhere on the row opens the portal file with subject, parties, appeals and the history of all hearings; from there Open case takes you to the case. A hearing for a file that is not yet linked to a case is marked new/unregistered.
New entry and editing
Appointment. Enter a title and a date (both required), choose the type (court appointment, witness examination, meeting, phone call, other or task), set the time from and to, and add a description.
Location. The fold-out location card takes address, postcode, city, district and country. Switch on Geo coordinates to search for an address or click the map to set the exact spot.
Assignment. Link the appointment to a case and add the persons and institutions involved by typing part of their name and picking them from the list; remove one with the small cross on its chip.
Preparation folder. Once a case is chosen, tick the chronicle entries you want to have at hand for the appointment. They appear later under Prepared documents and in the appointment PDF.
Save.Save (or Create for a new entry) returns you to the calendar on the date of the appointment; Cancel discards the changes.
Export and synchronisation
Privacy warning. Before the first .ics export after each program start, IRONSTICK reminds you that calendar entries leave the protected program in this format. Choose Continue to go on.
Export dialog.Download saves the file in your Documents folder and opens that folder. Google Drive appears only when a Google Drive folder exists on this computer and saves the file there.
Tablet calendar. On the Android tablet, if a calendar named IRONSTICK exists in the device's calendar account, appointments are kept in step in both directions; deadlines and hearings are copied to it one way.
11. Deadlines
All open deadlines, court hearings and dated AI reminders in one list.
The deadline list collects everything that is due, in date order: deadlines from your case chronicles, upcoming court hearings (from a national court portal and from your calendar) and reminders the AI noted with a due date.
The bell in the top bar always opens this screen. The picture shows the list and the export dialog of the deadline overview PDF.
Reference numbers. The #0000000 number of a document and the @mem0000 number of an AI reminder are copied to the clipboard with a click — for example to paste them into the chat.
Removing deadlines. Deadlines and AI reminders are removed in different places because they come from different sources. Deadlines from the app (documents and chronicle entries) are ticked with their check box and removed together. Reminders the AI has stored in its memory (brain symbol) are removed with Remove date: only the due date is taken away, so the reminder leaves the list.
What you can do here
Reading the list
Three kinds of rows. Deadlines have a check box; court hearings show an orange gavel and the word Hearing; AI reminders show a blue brain symbol.
Coloured date pill. The right-hand column shows the due date: red when it is today or overdue, orange when it is due within ten days, green when there is more time. Below it you read how many days are left or how many days ago it expired.
What each row tells you. Date and time of the entry, its title, the client, the case number and the case title. Hearings show court, section and courtroom.
Birthdays. A small cake in front of the name shows that the client has a birthday today or had one in the last two days.
Pages. With more than 20 entries the list is split into pages; the page buttons appear above and below the list and the header shows the current page.
Working with entries
Open the case. Click a row to open the case's Timeline on the right page, with the entry highlighted in yellow. Hearings without a linked case have no destination.
Open the document. The paperclip opens the document that belongs to the deadline.
Copy the entry number. Click the purple number under the date (or the reference of an AI reminder) to copy it; a short confirmation appears in its place. Paste it into the AI chat instead of describing the entry.
Remove deadlines. After ticking deadlines, a bar shows how many are selected. Its red remove button asks for confirmation and then takes them off the list and out of the bell count. The chronicle entries themselves stay in the case.
Print the overview. The print button at the top right creates the deadline overview as a PDF and opens the export dialog: Download saves it in your Documents folder, Google Drive appears when a Google Drive folder exists on this computer.
Nothing due. When there are no open deadlines, a green tick tells you so.
12. Daily log
The daily log, a new entry being pasted in, and one day opened.
The daily log is your work journal across all cases: one entry per day with what was done, sent, decided or prepared.
Entries come from texts you paste or drop in, or are written at your request by a desktop AI connected through the IRONSTICK bridge at the end of a work session.
The picture shows the list, the window for a new entry and an opened day with the case timeline of that day.
What you can do here
The list
One row per day. Each row shows the date, the title of the day and how many cases it concerns. Twenty rows fit on one page; page buttons appear above and below when there are more.
Days without a daily log. Grey rows marked Case timeline (no daily log) cover days on which something happened in your cases but no daily log was written. Click one to see the chronicle entries of that period and open any of them in its case.
Delete a day. The small cross at the end of a row deletes that day's log after a confirmation.
Opening a day
Overview. The window shows the date and the cases of that day as chips.
Events. Each event shows its date, text and links to case numbers or entries; a blue link opens the case's Timeline with the entry highlighted.
Into the chronicle. Where offered, the blue chronicle button on an event lets you pick a case and then opens a new chronicle entry for that case, so the event becomes part of the case file.
Case timeline for this day. Lists the chronicle entries of all cases on that day with time, title and case number; click one to open it in its case.
Full text.Show full text unfolds the complete text of the day, which you can select and copy.
Generating a new entry
Bring in the text.Generate new entry opens a window where you drop a .txt or .md file (or click to choose one) or paste the text directly. This button is available on the PC, not on the Android tablet.
Analyse. A text in the daily-log format is split into days directly. Any other text can be handed to the external AI, which finds date, title and the cases mentioned; IRONSTICK asks for your consent first. If you decline, a hint explains the expected format.
Check before importing. For each recognised day you see a card: tick or untick it, correct the date and the day title, switch the assigned cases on or off and read the events found. A Merge badge means a log already exists for that date; the new text is added to it, nothing is overwritten.
Import or go back. The import button saves the ticked days; the left button takes you back to the text. Before analysing, Discard closes the window without saving.
Entries from the AI. When you ask the AI to update the daily log, it adds the day's sent e-mails, pleadings and decisions; an existing day is always extended, never replaced.
13. Texts and word processing
The list of texts
All your letters and pleadings, grouped by client and case.
This screen lists every letter and pleading written in IRONSTICK, always in its latest version.
Documents are grouped by client, case and chronicle entry, so related texts stay together.
A click opens the document in the word processor, shown on the right of the picture.
Compose text. Opens the word processor with an empty page for a new document.
Open a document — versions grouped. Click a document to open it in the word processor. Each document appears once, with its latest version number and the date of the last save; documents of the same client, case and entry are grouped under one heading that you fold and unfold with a click.
Delete. The bin removes the document from the list after a confirmation.
What you can do here
Groups. When a client, case or chronicle entry has several documents, they are folded into one row with the number of documents. Click the row to unfold or fold it. A single document is shown directly with its client and case.
Coming from the search. When you open a text from the search results, its group unfolds and the document lights up yellow for a few seconds.
Always up to date. When you come back from the word processor, the list reloads and shows the new version.
PC only. The word processor runs on the Windows PC. On the Android tablet the list is visible, but opening a document shows a notice instead.
Editing, read aloud and annexes
The editor with its toolbar and the annex list.
The word processor shows your document as A4 pages, exactly as it will be printed.
The toolbar above the page holds the formatting tools, read aloud, the annex list and the AI switch.
The status bar at the bottom counts words, characters and pages. The picture shows the annex list opened over the editor.
Read aloud. Reads the document aloud, paragraph by paragraph, in the language of the case's country, highlighting the part being read. Click again to pause and once more to continue. Works for documents that belong to a case.
Annex list. Opens the list of annexes for this document. The small blue number on the paperclip shows how many annexes are attached.
What you can do here
Toolbar
Formatting. Undo and redo, paragraph style (normal text, three heading levels, quotation), font size, bold, italic, underline, strikethrough, text colour and highlight colour.
Layout. Left, centred, right or justified alignment, bulleted and numbered lists, decrease and increase indent, and Clear formatting.
Letterhead. When you have uploaded a letterhead template in the configuration, a button switches it on or off. It is on by default and reserves the top of the page for your letterhead.
Keyboard. The Tab key inserts a tab. Ctrl+S saves and closes, Ctrl+P opens the print preview.
Writing and pasting
Paste from other programs. Text copied from Word, LibreOffice or a web page is cleaned to the formatting the editor supports. Plain text that looks like Markdown is converted into headings, lists and bold text.
Drop a file. Dragging a .md or .txt file onto the editor replaces the whole content with the file's text, converted to formatted text.
Placeholders. Drafts from the AI may contain gaps in square brackets. They appear as chips and a banner counts them. Click a chip, type the text and press Enter; Escape leaves the gap open. A double-click turns a chip into normal text without brackets.
Page breaks. Dashed lines show where each page ends. Drag a line upwards to start the next page earlier; it snaps between two lines and turns orange when moved. A double-click puts it back. Your breaks are saved with the document.
AI revision
Switch the AI on. The AI off / AI on switch shows coloured bars beside the page: dark blue for the topics the AI recognises in the document, medium blue for each paragraph and light blue for each sentence. Pointing at a bar highlights the matching text.
Revise a passage. Click a bar, describe in the box what should change and press Enter or Revise. The AI rewrites exactly that topic, paragraph or sentence and puts the new text in its place. Names, case numbers and other identifiers from your records are replaced by neutral placeholders before the text is sent to the external AI.
Annex list
Add by evidence ID. Type the number of a chronicle entry (for example 357 or 0000357) and press Enter or Add. The entry's PDF is attached; for photos, recordings, transcripts or entries without a PDF, IRONSTICK creates a PDF for the annex.
Add manually. On the Manual tab enter a title and an optional note for an annex that is not in IRONSTICK, for example a paper document you will hand in yourself.
Order and remove. Each annex shows its number, a badge (DB for an entry from IRONSTICK, MAN for a manual annex), the title and a link to its PDF. Drag an annex by its handle to change the order; the cross removes it.
Insert into text. Writes the numbered annex list at the end of your document, or replaces the list already there. Each line shows the annex title, the document's IRONSTICK stamp reference if it has one, and its page range, which is filled in automatically in the print preview.
Annexes taken from the text. If the list is empty but your document already has an annex section with entry numbers, IRONSTICK offers to take those entries over as annexes in one step.
Edit, preview and saving
The Edit and Preview tabs; the preview offers print preview and saving.
Two tabs sit above the toolbar. Edit is where you write; Preview shows the finished pages one below the other, read-only, with page numbers.
In the preview the formatting tools are hidden and the buttons for the print preview and for saving appear.
Edit. Returns to the editable page with the full toolbar.
Preview. Splits the document into separate A4 pages exactly as they will be printed, so you can check the page breaks.
Print preview. Saves the document and opens the print preview with the document and all annexes.
Save & close. Saves the document and returns to the list of texts.
What you can do here
First save. A new document asks for a title. If the title is already used by another document, a warning appears and you choose a different one.
Versions. Every later save stores a new version of the same document; the list of texts shows the latest version number.
Annexes in the preview. The annex list button stays available in the preview tab.
Print preview, signature and stamps
The print preview puts the document and all annexes together into one PDF.
The print preview shows every page of the final PDF: first your document, then each annex with its title line.
The header counts all pages, the active pages and the excluded pages. Here you place your signature, leave out unneeded annex pages and switch on the certification stamp.
The picture shows an annex page enlarged (left click), an excluded page (right click) and the signature window (click on a page of the document).
Your document. The pages of the letter or pleading. Click one to place your signature on it.
Annex title line. Each annex starts with a line showing its entry number, its annex number and its title.
Certification stamp. The switch at the start of the line turns the certified-copy stamp on or off for this annex; the stamp text follows the language of the case's country. Grey means off, black means on.
DOCX. Exports your document (without annexes) as a Word file.
PDF Download. Builds the final PDF from all active pages and opens the export dialog.
What you can do here
Annex pages
Enlarge a page. A left click on an annex page shows it large; click anywhere or press Escape to close it.
Leave a page out. A right click excludes an annex page from the PDF; it is greyed out and marked with a red sign. Right-click it again to take it back. Page numbers count only the active pages.
At least one page per annex. The last remaining page of an annex cannot be excluded; a short notice tells you so.
Blank pages. Annex pages that are practically empty are recognised and excluded automatically. You can take them back with a right click.
Page ranges. Whenever you exclude or restore a page, the page ranges in the annex list of your document are recalculated, so they always match the final PDF.
With description. Annexes that IRONSTICK creates from chronicle entries have a with description switch on their title line. Switch it off to leave out the description, for example internal notes that should not go to the court; only that annex is rebuilt.
Signature and stamp
Place your signature. Click a page of your document. Your signature image appears on the page; drag it to the right place. Drag the corner point to make it larger or smaller and to tilt it slightly. Apply marks the spot on the page. This needs a signature image uploaded in the configuration.
No signature yet. If you start the PDF download without placing a signature, IRONSTICK asks whether you want to continue without one.
Certification stamp. For annexes with the stamp switched on, every page receives the stamp in the language of the case's country, with today's date, placed in a free spot in the lower part of the page. If you placed your signature on the document, it is added to the stamp as well.
Creating the PDF
One PDF.PDF Download joins the document and all active annex pages into one PDF with continuous page numbers at the bottom of every page and the annex number on annex pages. The text stays searchable. A progress window shows how far it has got; pages that could not be processed are listed in a notice.
Export dialog.Download saves the PDF in your Documents folder; Google Drive appears when a Google Drive folder exists on this computer. Prepare mail saves the document, prepares the PDF for sending and opens the mail dispatch screen with it attached.
Cancel. Closes the print preview and returns to the editor.
14. E-mail Monitor
The inbox with priority and case assignment, and an opened e-mail with its attachments.
The E-mail Monitor brings the mailbox you set up in the configuration into IRONSTICK.
New mail is fetched automatically in the background, rated by priority and, where possible, assigned to the right case.
The picture shows the inbox list on the left and an opened e-mail on the right, with its attachments and the button that turns the e-mail into a case document.
Inbox and Sent. Switch between received and sent e-mails. All filters, counters and the list then refer to the chosen folder.
Date, captured tick and mail number. When the e-mail arrived, in your local time. A green tick means the e-mail has already been captured as a document. The purple number (for example @M0000519) identifies the e-mail; click it to copy it to the clipboard.
Priority. The rating High (red), Medium (orange) or Low (grey). A dash means the e-mail was judged unimportant (for example a newsletter) or has not been rated yet.
Case recognition. The case this e-mail belongs to, shown as client and case number; a dash means no case was found. The small grey line below says how the case was recognised. Recognition runs in this order:
Without AI, directly from the text: the court file number of one of your cases (via case number), a registration or letter number known from one of your documents (via letter number), a client number (via client number), or a reference to something you sent (reply to our submission).
Otherwise the AI rates only the priority and writes a one-sentence reason — it assigns no case.
Then the fallback: the sender is an institution or person linked to a case (via institution, via person) or a known sender (known sender).
Attachments. The opened e-mail lists its attachments with name and size. Click an attachment to view it: PDFs and images open in the IRONSTICK browser window, other file types in the program your computer uses for them.
Add as document. Turns the e-mail, including its attachments, into one PDF and opens document capture, where you file it into a case.
What you can do here
Fetching and rating mail
Automatic fetching.IRONSTICK collects new mail at start-up and then every few minutes on its own. If a new e-mail arrives while the monitor is open, the list refreshes by itself. Opening the monitor clears the new-mail signal on the envelope icon in the top bar.
Fetch mails. The blue button at the top right fetches new e-mails from the inbox and the sent folder right away. A short message tells you how many new e-mails arrived.
Automatic rating. After fetching, every new e-mail is checked. If the text contains one of your case numbers, the case is assigned directly. Otherwise the AI rates the priority and writes a one-sentence reason, which appears in purple italics under the subject. Progress is shown at the bottom of the screen.
Mailbox not set up. If no mailbox has been configured yet, a yellow notice at the top tells you to set it up in the configuration. The header line shows your mailbox address and the number of active e-mails.
Filters and list
Active. All e-mails you have not hidden — this is the default view.
Important. Only active e-mails rated High.
All. Every e-mail in the folder, including hidden ones.
Hidden. Only the e-mails you have hidden. Each filter shows its count in brackets.
Reading the list. Each row shows date, sender (in Sent: recipient), subject with a one-line preview, the AI reason, the number of attachments (paperclip), priority and case. Unread e-mails are shown in bold. When there are more than 50 e-mails, page navigation appears above and below the list.
Hide an e-mail. The crossed-out eye at the end of a row hides the e-mail from the active list. You can still find it under Hidden and All.
Reading an e-mail
Open. Click a row to open the e-mail in a window. It shows sender, recipient, copy recipients, date, the attachment list and the full text. Opening it marks the e-mail as read.
Fast after the first time. The text is downloaded the first time you open an e-mail and kept, so later it opens instantly without contacting the mail server.
Privacy. Remote images are blocked, so tracking images cannot report when you opened the e-mail. A small notice above the text tells you when images were blocked.
If the mail server cannot be reached. The window shows the stored preview text instead, with a short notice.
Capture again. For an e-mail that has already been captured, the button turns red and reads Add as document again, so you do not file the same e-mail twice by accident.
From the chat. When the chat links to an e-mail, the monitor opens with that e-mail already shown, in the correct folder.
How attachments end up in the document
One PDF. When you capture an e-mail, PDF attachments are added page by page, images become their own pages, and Word, OpenDocument and Markdown attachments are added as text. A file that cannot be converted gets a placeholder page and is also saved separately next to the PDF.
15. Time tracking
Working time recorded automatically, per case, per client and per day.
Time tracking works automatically: IRONSTICK records which screens you open and for which client and case.
From this it calculates how long you worked, and shows the totals per case, per client and per day.
The picture shows the view for today; when IRONSTICK SERVER is connected, the daily totals per case are also reported to the server.
What you can do here
Choose the period
Period buttons.Today, 7 days, 30 days, 90 days or Total. All tables below follow the chosen period. When you open the screen, the last 30 days are shown.
Overview
Three figures. Time worked today, time worked this week, and the total for the chosen period. Today and this week always stay the same, whatever period you pick.
Tables
Time per case. Each case with its number, title, client and time, with a bar for comparison. The number of cases appears at the top right of the card.
Time per client. The same, added up per client.
Daily overview. Date, weekday and time for each day (up to 60 days), with the total for the period at the top right. Today's row is highlighted in light blue.
How the time is counted
Automatic. Each screen you open counts until you open the next one. A gap of more than 30 minutes counts as 30 minutes at most, so a break does not inflate the figures. The last screen of the day counts one minute.
No data yet. Directly after the first start, the screen tells you that time tracking has just been switched on and no data exists yet.
IRONSTICK SERVER. When the server is connected, IRONSTICK reports your daily time per case to it every five minutes. Time that is not linked to a case is not reported.
16. Statutes
The legal library, the window for adding a statute and an opened statute text.
The statutes screen is your legal library: the full texts of laws, ordinances, decisions and standards, stored on your computer and fully searchable.
You add a statute by a web link or a PDF/Markdown file; IRONSTICK then fetches, cleans and classifies the text in the background.
The AI uses this library first whenever it needs a legal provision. The picture shows the list, the window for adding a statute and an opened statute with its own search.
Search all statutes. Type a term and press Enter or Search. The results open on their own screen, sorted by statute, with a text excerpt for every place found.
Create. Opens the window for adding a statute: paste a web link into the field, or drag one or more PDF or Markdown files onto the area below, then click Create.
Opened statute. Click a statute in the list to read its full text. The search field under the title searches only within this statute.
What you can do here
Adding statutes
By link or file. In the Create window, enter a web address or drop PDF/MD files; dropped files are listed and can be removed with the small cross. A link that already exists in the library is not added twice; an invalid link shows Failed.
Fetched in the background. While a statute is being prepared, a progress bar shows the stage it has reached. If loading was interrupted, click the bar to start it again. The list updates on its own when the statute is ready.
Proposed by the AI. When the AI finds a statute that is missing from the library, it does not add it silently. You get a window listing the proposals and tick the ones you want to keep.
The list
Each entry. Title, date added, legal area and a short description, the source link, and labels for the country and the type of act (law, ordinance, decision …). Click the source link to open the original page in the IRONSTICK browser window. Statutes you uploaded as a file show the file name instead of a link.
Red entries at the top. A statute shown in red could not be loaded, or has not been re-checked for more than a month. Click a failed entry to try loading it again.
Greyed-out entries. A statute whose source can no longer be verified is greyed out and labelled not verifiable. Click that label to open the source in the IRONSTICK browser window and check it yourself; the opened text then shows a red notice at the top.
Acceptance pending. A newly prepared statute waits for your confirmation in the data monitor. Click the label to go there. Only accepted statutes are shared via IRONSTICK SERVER.
Delete. The bin icon removes one of your own statutes after a confirmation. If IRONSTICK SERVER is connected, the statute is removed there too.
Pages. With more than 20 statutes, page navigation appears above and below the list.
Filters
All, Own, Others.Own shows the statutes you added; Others shows statutes that other users added via IRONSTICK SERVER. Those carry their owner's ID and name under the title and cannot be deleted by you.
Expired. Shows only the statutes whose source can no longer be verified.
Country. The drop-down next to the filters limits the list to one country.
Searching
Across the whole library. The search ignores accents and special letters and also finds words that begin with your search term; article numbers are matched exactly. On the results screen, click a statute's title to open it at the first place found, or click an excerpt to jump straight to that place.
Within one statute. In the opened statute, type a term and press Enter or Search. All places found are marked in yellow and the text jumps to the first one. Click the counter (for example 1/12) to move to the next place; after the last one it starts again from the first.
17. Server cases
Cases you share via IRONSTICK SERVER, with their subscribers.
Server cases is where you work with cases that are shared between users of IRONSTICK SERVER — the office server.
You see which of your own cases you have shared and who follows them, and you can subscribe to cases that other users share.
This screen, and its tile in the main menu, appear only when the server is connected. The picture shows one shared case with two subscribers.
What you can do here
Incoming handovers
Take over a case. When another user hands a case over to you, it appears in this card at the very top. Click Import to bring it into your own data.
Checked import. The case package is downloaded and checked for completeness first. You then choose whether the client already exists with you or is added as a new client. If you already have a case with the same number, you are offered to merge the two. Where the data differ, a list of the differences is shown, and at the end a message confirms how many entries and files were imported.
My shared cases
Your shared cases. Lists every case you have shared from the case screen, with case number and client. Click the case to open it.
Remove sharing. Ends the sharing of this case on the server.
Subscribers. The users following the case are listed below it. A user who has asked to follow is marked Requested; click Accept to let them in. Remove ends an active subscription or turns down a request. If nobody follows the case yet, the card says so.
Cases shared by others
The list. Shows the cases other users have shared with everyone or with you personally, with case, owner and office. If there are none, the card shows No entries available.
Request subscription. For a case shared with everyone, you ask the owner to let you follow it. The label Requested appears until the owner accepts.
Subscribe. For a case shared with you personally, the subscription is active immediately; the label changes to Subscribed.
Unsubscribe. Ends your subscription or withdraws your request.
Server not reachable. If the connection to the server is lost, the card shows that no server is connected.
18. Backup
Create a data backup, see the recent backups, or restore one.
The backup screen saves all your case data into a single ZIP file, and puts it back when you need it.
You decide where the file goes — a local folder, an external SSD or a USB stick.
The database and the stored case files keep their AES-256 encryption inside the backup. The picture shows the backup card, the list of recent backups and the restore card.
What you can do here
Back up
Create data backup. Saves your database, your documents and files, and your configuration and licence into one ZIP file. Language models for the local AI and voice output are left out, because they can be downloaded again.
Progress. A window shows how far the backup has got (file X of Y) and which file is being packed. The backup runs in a separate background process, so you can keep working.
Choose where to save. When the ZIP is ready, a save dialog asks for the location and file name. If you cancel, no file is kept. When saving has finished, a message shows the file name, size and number of files.
Recent backups. The last five backups are listed with date and time, file name and size, so you can see at a glance when you last backed up.
From the chat. If you ask the chat to make a backup, this screen opens and starts the data backup straight away.
IRONSTICK SERVER. When the server is connected, every backup and every restore is reported to it: who made it, when, from which IP address, the type, file name and size — never the backup data itself. The administrator sees this on a page of the server, together with each user's last backup date (shown in red after more than five days), and can remind users to back up.
Restore
Choose backup. Select a backup ZIP. IRONSTICK first checks that it really is an IRONSTICK backup; any other file is refused with a notice.
Confirm. Restoring overwrites your current data. A window asks you to confirm; click Cancel to stop, or Restore to go ahead.
Progress and result. A progress window shows each file as it is put back, and a message tells you whether the restore succeeded. Because the backup contains your configuration and licence, these are restored as well.