Quick start — from installation to your first clients in six steps.
1. Install IRONSTICK
The installer, screen by screen.
Download the installer and set up IRONSTICK on your Windows computer in a few clicks.
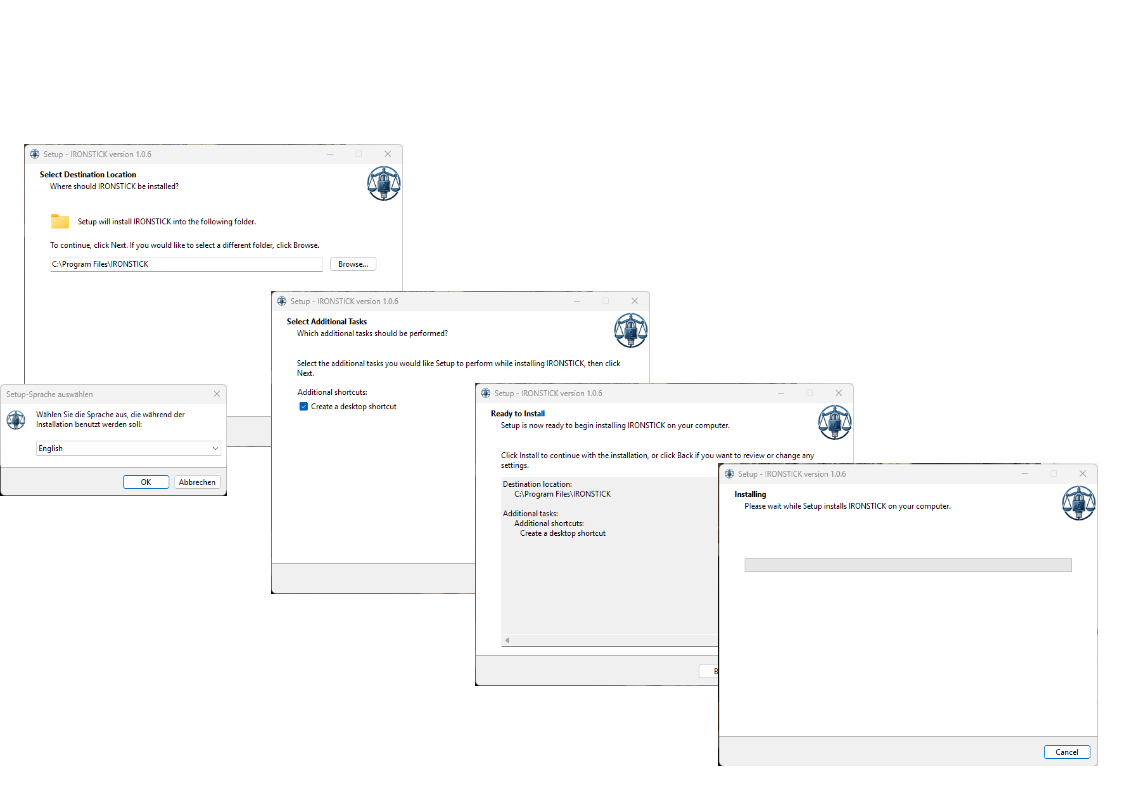
Choose the installer language, the destination folder and whether to create a desktop shortcut; the program is then installed.
If IRONSTICK is already installed, install the new version over it — your data stays where it is.
What you do here
Installer
Installer language. Choose the installer language and confirm with OK.
Destination folder. The suggested folder is C:\Program Files\IRONSTICK. Keep it, or choose another one with Browse….
Desktop shortcut. Leave the tick set if you want an IRONSTICK icon on the desktop.
Install. The summary shows folder and shortcut once more; Install starts the installation, and a progress bar follows its course.
First start
Licence key. On the first start IRONSTICK asks for your licence key. Enter it from your licence document, or paste it.
Security code. After a valid licence key you see a QR code. Scan it with an authenticator app on your phone. From then on, IRONSTICK shows your data only after you have entered the six-digit code from that app.
New phone. If you replace or lose your phone, enter the licence key again on the start screen; the QR code appears again so that you can set up the new phone.
2. Licence, user and language
The licence key, your user card and the language of the program.
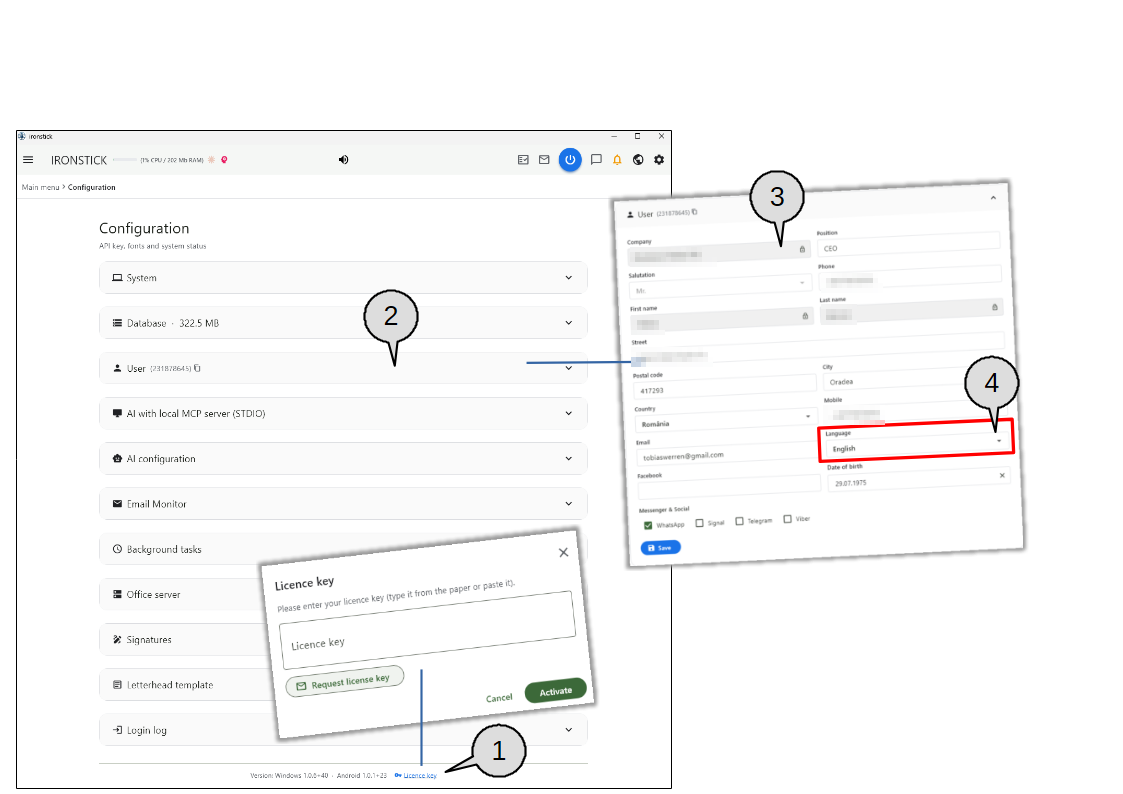
Open the configuration with the gear icon in the top bar.
Here you enter or renew your licence key, fill in your user card and choose the language of the interface and of the AI dialogue.
Take a minute for the user card: your details are used in letters, pleadings and the licence request.
Licence key. The link Licence key under the version line opens the licence window. Enter or paste the key and click Activate. Request licence key checks that your user card is complete and prepares the request text with subject and recipient, each with a copy button.
User. Opens your user card. The number next to the title identifies your installation; the small symbol copies it.
Fields from the licence. Company, salutation, first name and last name come from your licence key and are locked (padlock). Fill in the other fields: position, address, country, phone, mobile, e-mail, date of birth and the messaging apps you use.
Language. The language of the interface and of the AI dialogue. After Save, every screen switches to the new language at once.
3. AI configuration
Free services for background tasks, and your AI services for the built-in chat.
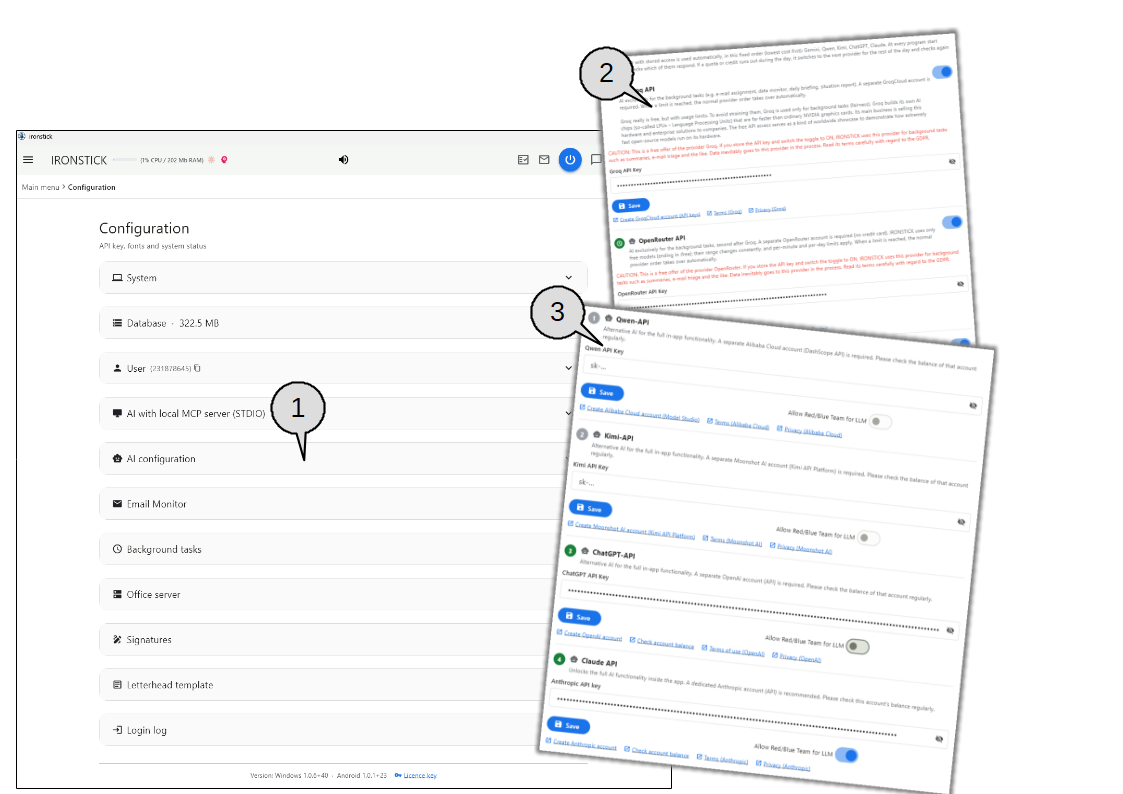
The AI configuration holds the access keys (API keys) of the AI services IRONSTICK may use.
There are two kinds: free services that only do background tasks, and the services for the full AI functions of the built-in chat.
You need an account with the respective service; the links below each field lead to its sign-up, terms and privacy pages.
AI configuration. Opens the card with all AI services.
Free services for background tasks. Used only for background work such as e-mail prioritisation, the data monitor, the daily briefing and the situation report. Click the link below the field to create an account directly with the provider and generate an API key there. Paste this API key into the field and click Save. The toggle switch next to the service turns that service on or off for these activities — even while its API key stays stored. The notice below each service states the provider's terms under which it handles your background tasks.
AI services for the built-in chat. Click the link below the field to create an account directly with the provider and generate an API key there. Paste the API key into the field and click Save. A top-up of at least 20 dollars/euros per provider is recommended. Ideally, store at least two providers: if several services are stored, IRONSTICK uses them automatically in the fixed order shown by the numbers, the lowest-cost first; the next one then takes over seamlessly, and your work continues without interruption.
4. Your signature
Draw your signature once — or upload it as an image.
Your signature is stored once in the configuration.
IRONSTICK places it where you sign documents: in the print preview of the word processor and on the stamps of the annexes.
You can draw it with the mouse or on a touch screen, or upload a scan of your signature.
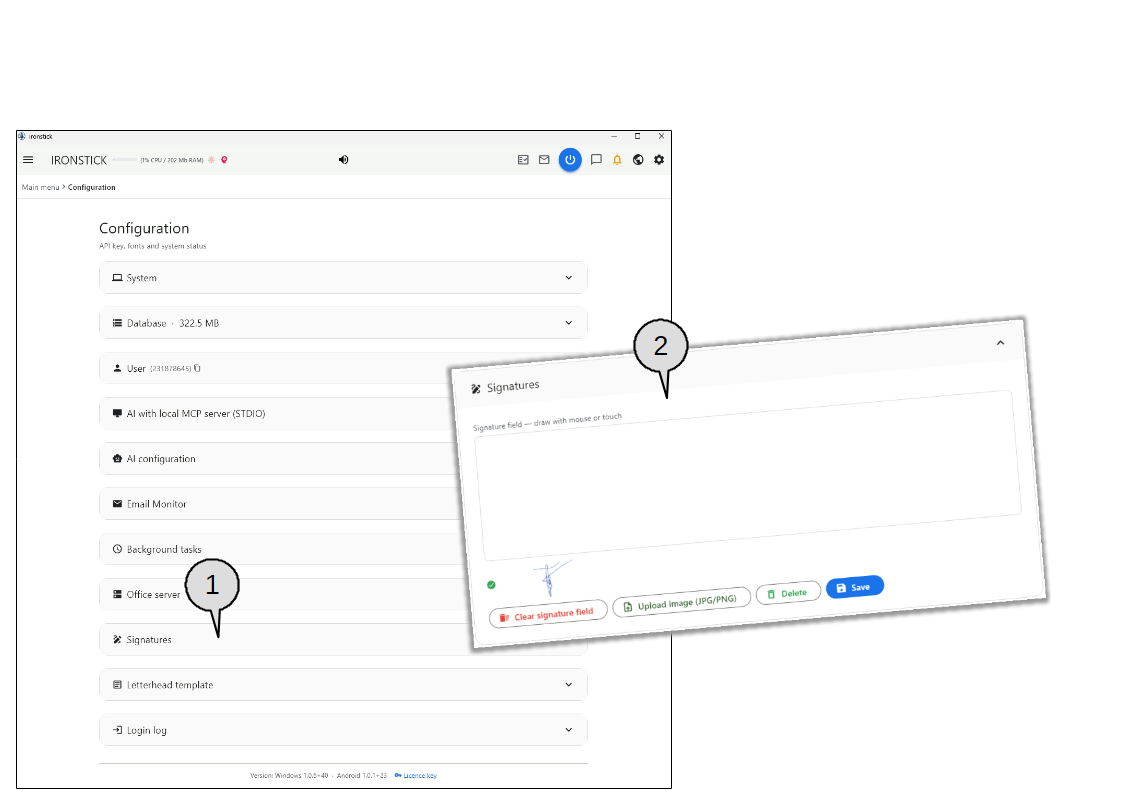
Signatures. Opens the signature card.
Signature field. Draw your signature with the mouse or your finger. Clear signature field starts again; Upload image (JPG/PNG) takes a scanned signature instead; Delete removes the stored signature; Save stores it. The green tick and the small preview show the signature currently stored.
5. Letterhead template
Your firm's letterhead on your pleadings.
Upload your firm's letterhead once as an A4 PDF.
IRONSTICK places your pleadings on it, with the text starting below the letterhead.
In the word processor you switch the letterhead on or off for each document.
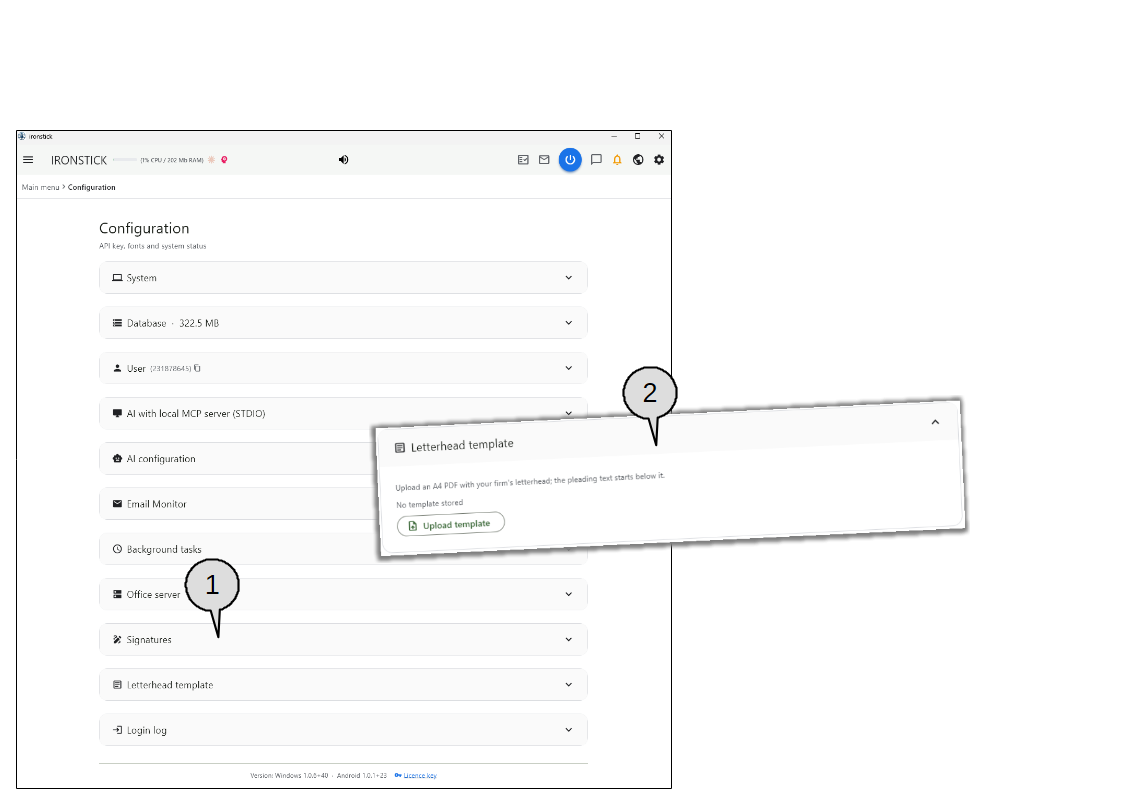
Letterhead template. Opens the card for the template.
Upload template. Choose the A4 PDF with your letterhead. As long as no template is stored, the card says so.
6. Import your clients
Import your existing clients from another program.
You do not have to type in your existing clients one by one.
Export them from your previous program or your address book as a CSV or vCard file and drag that file into the import window.
If you have not used a client management system before, an export from your billing or invoicing software is often a good source for the import.
To add a client manually, use New client.
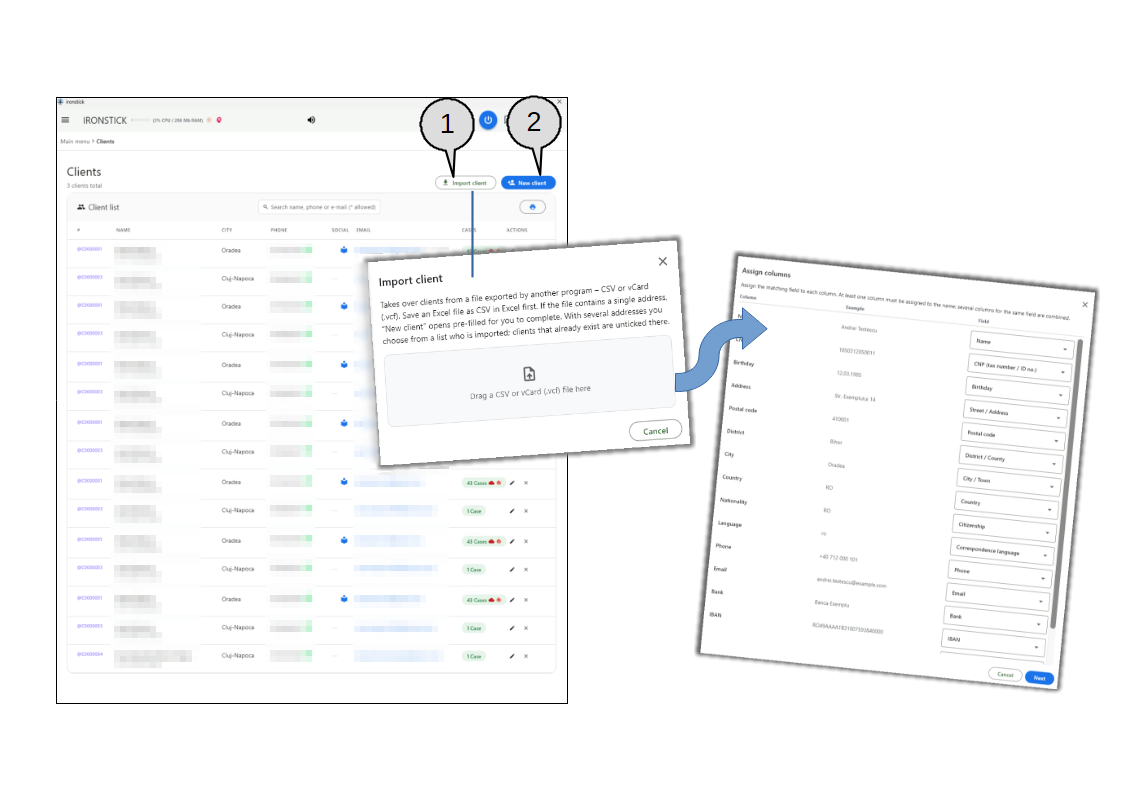
Import client. Opens the import window. Drag a CSV or vCard (.vcf) file onto the drop area. Save Excel workbooks as CSV first. For a CSV file, a second window lists each column with an example value and the field it goes into; the assignment is pre-filled and you can change every field. At least one column must be assigned to the name. If the file holds one contact, the New client form opens pre-filled; if it holds several, you select the contacts to import from a list — clients that already exist are not selected.
New client. Opens an empty client form for a client you enter by hand.
And with that, you are ready to capture your cases in IRONSTICK. Whether you enter all your existing files into IRONSTICK or simply start working with IRONSTICK on your new cases is up to you. In practice, a mix has proven to be the best way: capture by hand a few important existing cases that urgently need the support of IRONSTICK, and at the same time handle all new cases straight away in IRONSTICK.